Wednesday, August 19, 2020

Binding Tip for a Quick Finish

More and more on the wall hangings or samples for my trunk shows I'm sewing the binding to the front as usual, wrapping it over to the back and gluing it down, and then stitching in the ditch from the front to secure it. Only special quilts are getting hand bound at this point. Stitching in the ditch from the front to finish your binding requires finding a way to secure the binding on the back to hold it in place until it is stitched from the front. Several quilters have shared various techniques or even sewing the binding to the back and wrapping it around to the front to stitch down, sometimes with decorative stitches. I've taken what I like to create a technique that works for me.

My preferred way is to still sew the binding to the front, then use either a glue stick or my Roxanne's Glue Baste-It squeeze bottle to run a bead of glue along the stitching line on the back and then wrap the binding over and set it with a hot iron. It works like a charm!
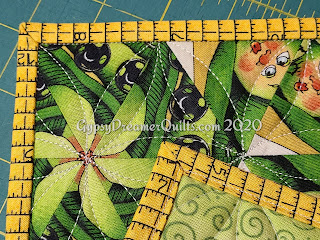
On this Sashiko FMQ sampler, I will be hand stitching the binding, but I still did the glue technique so I could be sure the binding was even and secure before taking needle and thread to it. I find I can get much better mitered corners this way and my machine stitching from the front always catches the binding as I make sure the binding is slightly overlapped beyond the stitching line that attached the binding to the front. A piped satin flange was added to this sampler, increasing the layers, so I tried to take extra care with it. After the binding is hand sewn, the hanging sleeve will be hand stitched on and the quilted wall hanging will be blocked. 
I love the Roxanne's Glue Baste-It squeeze bottle. Unlike many of our "use it and throw it" supplies, this little bottle is refillable.You can purchase refills of Roxanne's glue or you can do what I do and refill with original white Elmer's Glue.
The white cap that the pink piece is screwed into actually comes out. I use a small pair of pliers to get it loose and re-secure it once the bottle was refilled. It's so easy to hold this little bottle in your hand, squeeze just the right amount out of that small tip, and fold the fabric with my other hand. Finding the right tool that works for you is amazing!
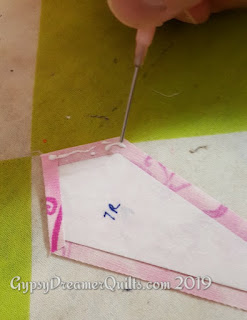
This is the same glue applicator I use when making applique pieces that need to be secured to their templates. For the petals of the Dresden Hearts I glued the templates cut out of Ricky Tims' Stable Stuff Poly, a leave-in stabilizer that washes away, directly to the wrong side of the fabric, and then glued the folded tops of the fabric to the stabilizer to hold them in place until sewn. 

There are many times a dot of glue is helpful and the Roxanne's Glue Baste-It squeeze bottle is what works best for me. 

More snippets from the sewing room soon,
Liz

Tuesday, August 18, 2020

Hexified Panels & OBWs--Have all panels from same bolt

Cut OBW/Hexified Panel Quilt Panels from the Same Bolt

To make a Hexified Panel Quilt you need seven (7) panels or for a basic One Block Wonder six (6) repeats for hexies or eight (8) for octagons. Having faced this issue myself with a student in a classes and also a project of my own, I've learned it is critical, if at all possible, to have all of the panels that will be cut into strips and triangle sets be from the same bolt. For Hexified Panel Quilts, having the seventh uncut panel to frame come from a different bolt is probably acceptable, but preferably not the six panels to be cut. Some differences may be subtle like variances in color saturation, while others are much more obvious with actual differences in panel or block sizes.

When fabric is produced, each run may come out slightly different. The ink saturation may vary making one run darker or more vibrant than the other. As finished fabric is run through the machine to fold and roll the fabric onto bolts, it may stretch or tweak differently by bolt. If a fabric is popular, a new printing may be done that starts with different greige goods (raw fabric before dyeing or printing) or even a different manufacturing plant. Each of these factors can make the panels or blocks vary from bolt to bolt. These issues can definitely cause problems when trying to line up your layers accurately to cut strips and sub-sets. 

I first came across this problem in 2016 when a quilter in one of my classes had purchased panels over the internet. She got three from one vendor and four from another to make up her seven panels for a Hexified Panel Quilt. What we discovered together was that the panels from the two vendors were printed differently. The width of fabric on one set was over 1" longer than the other, throwing off the alignment of the two sets of panels. The 24" panel width along the straight of grain was pretty close on both sets. We decided together to have her cut the strips across the straight of grain panel width and readjust her pins aligning layers after each cut to keep the WOF print close to the same. It was a tedious process with a fair amount of waste, but together we got all of her strips and triangle sets cut and she did eventually complete the project. 

After seeing these gorgeous Elizabeth's Studio Hummingbirds & Flowers block panels at the 2019 Spring Quilt Market in Kansas City, I ordered two bolts to cut into kits for my classes and workshops. A few weeks after Market, I received a call from the warehouse manager saying they had several partial bolts and asked if that would be okay. Not giving it a lot of thought and not remembering my experience in the 2016 class, I said I'd take them all. I soon received three bolts--one 7 yard bolt with ~10 repeats, one 11 yard bolt with ~16 repeats, and one full 15 yard bolt with ~22 repeats. I hoped there would be enough repeats to make multiple kits for future workshops.  

I pulled the two partial bolts down from the stash closet and began cutting the panels apart into four kits each--two blocks half width of fabric by one block wide. For the sample I was going to use the odd number of blocks from each bolt, making sure I didn't give anyone else the possibly difficult blocks to match up. I soon discovered that while they appeared the same, they were printed very differently. After cutting the blocks apart and starting to line up one set of six with pins, I noticed they weren't matching up at all. As a test, I folded one set of blocks in half and laid it over the same set of blocks from the other bolt and you can see the clear difference.

The light blue border surrounding the blocks was a different width between the blocks. Even the blocks were not the same size. Looking closer, the selvedge on one bolt had the light blue background going right to the edge of the fabric, whereas the other bolt had a white selvedge with the blue starting half inch from the edge. Still, the information printed on the selvedges was the same. I separated the blocks back into separate piles by bolt and had to rethink my plan. I then took down the third bolt to check it against the other two.

 
Even on the two bolts that were printed the same, the color saturation was definitely darker on one bolt than the other as you can see between the blocks on the left and those on the right. Mixing those two sets to make hexies would make interesting hexies with uneven color saturation.

There are so many ways to adapt and tweak the One Block Wonder technique and its variations. I've used repeats across the width of fabric in order to get six repeats when I only had yardage enough for three or four of the six. I've seen others use mirror image blocks, lining up right and wrong sides of fabric to match up the print, to create very unique hexies when all six layers are then laid out with all right sides up. Regardless, in my opinion, if you have two bolts that are so different as the two I received, there may be no way to accommodate this much variance. With a full size panel it can possibly be done with care as my student and I learned back in 2016; however, with the smaller blocks especially, the variance between the two bolts I received was too great to bridge. 

More snippets from the sewing room soon,

Liz

Monday, July 27, 2020

Hexified Panel Quilt Kits now on my Etsy

I've been asked several times if my Hexified Panel Quilts kits for wall-hanging size projects are available for purchase. Initially the answer was no--they have only been available at my trunk shows or classes & workshops. However, during the long year+ of staying safe at home, the kits were each photographed and loaded onto my Gypsy Dreamer Quilts Etsy shop. Now you can purchase my Hexified Panel Quilts pattern (in paper to ship or digital to download), my GDQ-60R triangle ruler, and/or any kit from my collection and have it shipped to you anywhere in the US. At one point there were 30 different fabric panels that had been cut up into 50+ kits to pick from. Some have sold since they were first listed and I have many more waiting to be cut that will be added as time allows. Read on to learn more about how we cut the kits and the possibilities they present!
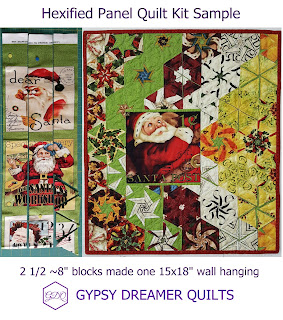
For the last several years as my travels have taken me to shops across major parts of the country, I've been purchasing sets of 7 fabric panels with multiple blocks that I thought would make good smaller projects to use in workshops and for attendees at my trunk shows to purchase to try the technique without having to invest in 7 full size panels that can be an expensive trial. These multi-block panels are cut into kits that are typically one block wide by half width of fabric, with a few variations depending on the panel layout. The panels have blocks that range from ~8x8" up to 22x24" that make up into a variety of wall hanging size projects. For those who may visit my shop and not really understand what I'm offering, I thought I'd give a little more explanation here and offer some samples even though not all of these samples are still available. The Santa sample was made early on as I was experimenting with blocks to make smaller projects and those kits have long been gone. That's why I continue to look for block panels from new lines to replenish my kit bag.

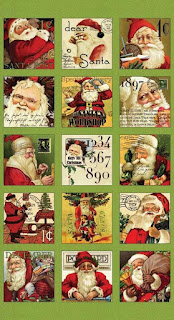
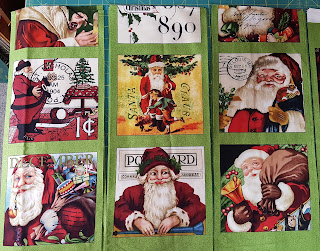
This Father Christmas fabric from Quilting Treasures featured a variety of Santas had three rows of five ~8x8" blocks across the width of fabric. I chose to cut the fabric at the fold, making each kit 22" by ~8" wide containing 2 1/2 blocks to cut and make into hexies. Unfortunately when I purchased these panels, I got the end of the bolt and the 7th set only contained two rows of blocks. Since all of the blocks were from the same piece of fabric and played well together, I cut the remaining ten blocks apart and placed one single block to frame in each of the six kits, so the blocks to be framed didn't necessarily match up with the ones in the six layers, but still coordinated well. 
For the Father Christmas sample, the set of six layers of 2 1/2 blocks were cut into three strips at 2 1/5" wide, making enough hexies to design around the single block to make a 17.5x20" mini with five leftover orphan hexies. It's rare that every hexie gets used in a quilt design. In most cases there are orphan halves left over from filling in the notches in the layout along the sides of the panel or outside edges, hexies that just didn't play well, or an odd number left over that won't make a complete row.

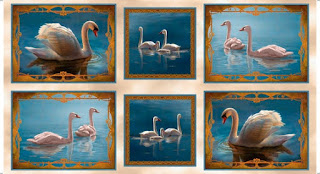
In the case of the Splendid Swans panel by Quilting Treasures, I chose to focus on the larger blocks and again cut the fabric in half at the fold, leaving 1 large block and 1/2 small/center block per half width of fabric and resulting in four kits.
I used one of these kits to make a sample in tandem with my students at a two-day workshop last year, using the gold frame from the partial block pieced into a border across the top of the full block for added interest. You can see the dark hexies along the right side are from the partial block, as well as those with the light frame between the blocks.
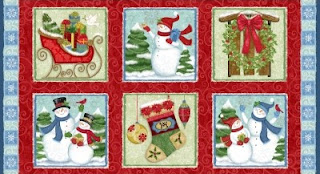
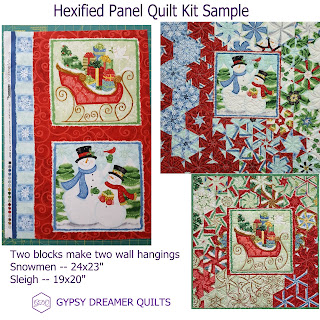
In some cases, panels have six blocks which are all interesting. In this case I cut the panel into sets of two blocks along the grain line instead of across the width of fabric. The Winter Joy panel by Studio E Fabrics is such a case, creating three distinct kits--two kits with the snowflake border and the center two blocks without the border.
When making a sample using a bordered set of blocks, the colors naturally gravitated to their own block, with the border matching the snowmen and making that top a bit larger.

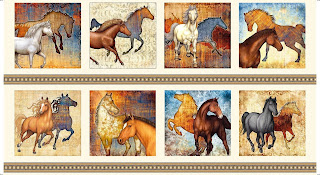
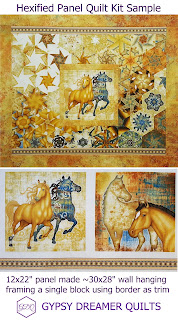
The Mustang Sunset panel by QT Fabrics had eight blocks, so the fabric was cut at the fold and then divided into four kits of two blocks each cut across the width of fabric. Since the border was printed between each set of blocks across the fabric, all of the kits had the border to play with.
In my sample, I trimmed the borders off the six layers before cutting my strips. The two blocks by half width of fabric were cut into 2 3/4" strips to make the hexies. By reserving the border, I was able to use it across the top and bottom of the finished hexie layout before adding a final border to frame the entire piece. I chose to use as many of the hexies as I could from both blocks laid out around a single block (the second block went into my orphan block collection), using a gold Northcott Stonehenge that blended so well with this panel for the inner frame and outer border.
When making a layout around a block or panel, having the hexies above and below match up with the side sections can be tricky. In this case, I needed to add a small frame around the center block to make it fit the opening in my layout. I had the choice of adding another round of hexies and trimming the block to fit a smaller opening or adding a border/frame to the block to "grow it" to fit the opening. Notice that the borders on the sides are narrower than those above and below the block. I typically don't trim a panel until after my layout is complete and the sections are sewn together and ready to attach to the panel whether a block or a full size panel. In this way I can decide to trim or border the panel to fit the space at the end of the layout process.  

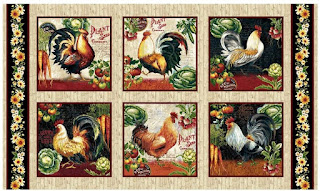
My final example is this fun Farmers Market panel by Studio E Fabrics featuring roosters and a floral border. I've had this panel cut into kits more than once. The first time we cut them, two kits were cut along the grain as two blocks each with the floral border, and two kits of individual blocks measuring ~12x12". I took one of the single block kits and decided to play.
I noticed as I started, being just a 12x12" block, there weren't as many hexies as I was used to designing with. It seemed the layout in a typical square or rectangular design just wasn't going to work. So, I started thinking outside the box and came up with a cascade of hexies falling into an irregular bottom edge, and added a burgundy border to the top and two sides that framed the light blocks nicely. 
I finished it by stitching the three layers, with top & backing right sides together, around all the irregular points, left an opening, and "birthed" the quilt, flipping it right-side out, for a fun finish without having to bind all those points. This is a fun example of "not all quilts have to be square"!

I've found working with these smaller projects to be great fun! After the pandemic, I have adapted several of my trunk shows into Zoom/PowerPoint presentations with live narration. It turns out I have over 60 wall-hanging size quilts, so I've created both Think Small for the Wall--Eclectic and Think Small for the Wall--Hexified, plus still have Adventures with 60 Degree Triangle Quilts that covers my journey through One Block Wonders, Stack & Whacks, and my evolution with Hexified Panel Quilts.  

More snippets from the sewing room soon,
Liz

Monday, June 8, 2020

Sit-Down Quilting with Rulers--Curves

My favorite way to quilt a Hexified Panel Quilt or One Block Wonder is with gentle curves or orange peels that curve from seam-intersection to seam-intersection. Since I press the seams all open when making these quilts, stitching all those seams in the ditch would be stitching only on thread. By using the curves, I secure every seam and create a lovely quilting design that is easy to do. I've done dozens of quilts this way completely free motion where the overall quilting is perfect in its imperfections. However, my sweet husband decided he wanted his Wolves Hexified Panel Quilt quilted with a ruler so the curves would be more uniform and fill more of each triangle. So, the adventure shifted early in 2019 to using a ruler on these quilts.
I've been teaching free-motion quilting on domestic and mid-arm sit-down machines for a number of years now. As my students have improved, they've asked for advanced classes using rulers. The plan was to teach several classes this year at area shops to demonstrate and teach quilting with rulers on domestic machines or sit-down midarm quilters. The COVID-19 pandemic changed all that as I cancelled all of my classes and workshops for the foreseeable future until we see how this all unfolds. I've considered doing an online class or Facebook Live, but haven't managed to make that happen yet. We shall see what the future holds in the way of classes--either live or online, but in the meantime we are playing with short videos taken with my camera to share.
I quilt on a HandiQuilter Sweet Sixteen sit-down midarm. The machine slides into a custom table that, with the extensions, is 6 feet long by ~30" deep. I have craft tables set on either side of my chair, tucked just under the edges of the table that carry the weight of the quilt as I shift it around. This allows me to keep the quilt "pooled" on the U-shaped nest and prevents the quilt from falling off the table and creating drag. I have quilted everything on this machine for the last almost 8 years from little 6x8" mug rugs to a huge 112x121" king size quilt with no problems. It just takes getting used to and focusing on the section you are quilting at the moment so as to not get overwhelmed by the larger projects.

Here's a link to a video (that Blogger says is too big to upload) that Les took today of me in action on my machine, quilting curves on a Hexified Panel Quilt using a ruler. I talked through some of the steps I take in holding the ruler, creating tension with my hands to keep the quilt layers flat, and more. It's linked to my Facebook page which I hope everyone can access. Be sure to follow me while you're there!

Now to add some additional illustrations and tips to expand on the information in the video.

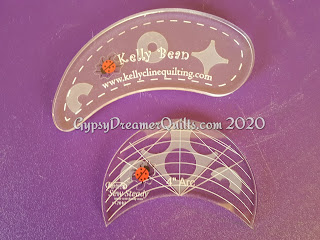
While quilting curves on one of our Hexified Panel Quilts today, I was using the little 4" Arc by Westalee/Sew Steady. The triangles I was filling measure 2" from point to flat side within each machine pieced kaleidoscopic hexie. The 4" arc curve is acute enough to fill these triangles nicely. On some of my earlier Hexified Panel Quilts that had larger triangles, I preferred the Kelly Bean ruler by Kelly Cline Quilting that has a somewhat gentler curve. There are many options out there, so find the one you like for the project you're quilting. Be sure to have some sort of non-slip sticker or adhesive product on the back of your rulers. You don't want them to slip and slide while quilting, as they should be moving with the quilt as you move them together along the quilting foot. These have True Grip self-adhesive circles or leftover pieces from the sheet of circles that are designed for quilting rulers. The rings are die-cut on a full sheet of the self-adhesive rubber, so when the rings are all used, be sure to cut up the leftovers! There's enough extra to use on several more rulers. Also, always set your needle stop in the DOWN position when quilting so when you stop, the needle stays down in your quilt to hold it in place. If you leave it in the UP position, when you let go of the quilt after you stop, the quilt will likely shift and create a jump-stitch when you are ready to begin stitching again.
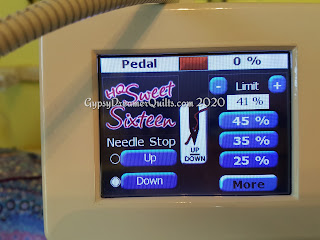
Before you start on a project, do enough practice with your ruler to know what speed you like to work at. I prefer to work at about 40% speed on my HQ Sweet Sixteen. As you can see from this picture, I have my presets on my machine set at 25%, 35%, and 45%. Depending on what I'm quilting, I can adjust up or down from there, but only on very rare occasions do I go beyond that 45%. I've found the speed that I'm comfortable with and stick with it. I find that when I set a specific speed, I can quilt "pedal to the metal" and not have to keep my leg/ankle in a constant state of tension trying to find and hold a specific speed. For those with midarms or even modern domestics that have a speed control, set it to a speed you're comfortable with so you can just put your foot down and go. 
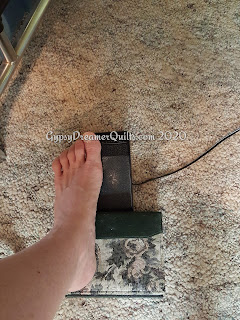
Yes, there's a little 2" thick photo album under my heel. I have found that even when quilting flat out, having my ankle flexed causes a lot of tension and strain in my leg by the end of the day. By elevating my heel I'm pressing down with my foot, letting my calf/leg stay more relaxed. It's definitely easier on me than having my heel on the floor and my foot angled up to press down. It's a little thing, but whatever you can do to make yourself comfortable for hours of quilting will help you enjoy the process more in the long run.
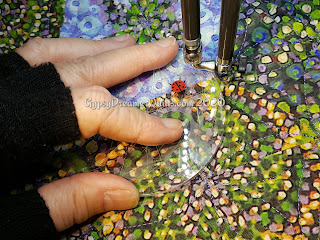
Here you can see me holding the ruler snugged up close to the closed quilting foot, spaced about 1/4" from the intersections I want to intersect with my stitching. You have to remember that the space between the edge of your ruler and the needle centered in that foot is 1/4", so you have to take that into account when placing your ruler to get the stitching where you want it. When you turn the ruler around to stitch along the next seam, be sure you stop at the intersection, keeping your hands and the ruler firmly in place, until you have completely stopped and taken your foot off the pedal. The needle may take one more stitch in place as it resets to the needle DOWN position, so don't be in a hurry to move your hands. Once you've repositioned the ruler, you are ready to go again, holding the ruler firmly in place and giving a little tension to the quilt around where you're stitching with your hands to prevent any ripples on the back and to ease the layers into the space you're quilting.
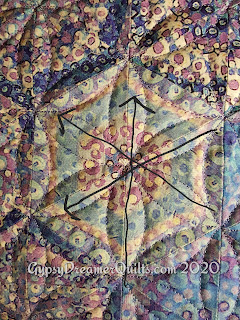
When quilting gentle curves/orange peels, I prefer to stitch long rows of curves that alternate direction. I will follow those long straight seams, alternating my curves from point to point, for as long as I can across or around the quilt. These rows can be done in such a way as to quilt an entire quilt with as few as 3 or 4 starts and stops. Along each seam there will be a curve on each side of it creating the melon shape. Three long rows of curves create all of the quilting, with two runs along each line--quilting S-curves in one direction and back the other way to complete the melons. Once all three rows have been quilted along the seams, they create these stars or flowers within each pieced hexie.
This view lets you see the same quilting design from both sides. The front of the quilt shows the stitching, pausing at each intersection along the seams to move the ruler back and forth to create the long S-curves, ultimately creating the 6 melon shapes that create the star. From the back, you only see the stars or flowers as an all-over design. Can you pick out the row(s) that still needs to be quilted? Yes, it's not completely done. There are a variety of ways to quilt orange peels, but after trying several, this is my favorite.

I hope this has been helpful for those who want to learn to quilt the orange peel/gentle curves on their OBWs or Hexified Panel Quilts. Please don't hesitate to message me or post questions if you'd like more information!

More snippets from the sewing room soon,
Liz

Monday, March 23, 2020

Virus Crisis Face Masks: Sewing with a purpose


This tutorial has been updated with a third version as of April 6, 2020. Please scroll down to find the serged version with t-shirt ties! 

Yet another update that modifies version 3 slightly for ear loops instead of ties. Scroll down to learn more! May 27, 2020
New information I found this week was reported in a news release from the Wake Forest Baptist Medical Center about a new study on the effectiveness of fabrics being used to make cotton masks and how much they filter. The best fabrics include tightly woven batiks with a layer of flannel. I've been using a fun cotton layer, batik inner lining, and flannel lining for those without a pocket. For those with a pocket for an additional filter (provided by the recipient facility), I'm using the fun cotton, two layers of batik (one cut width of fabric and the other length of grain), and a muslin pocket layer towards the face. To learn more about the study which said the best homemade masks provided as much as 79% filtration, check out the news release at:  Testing shows type of cloth used in homemade masks makes a difference

I'm ready if I need a mask when going out and about.

The Global Pandemic with COVID-19 Virus
has us Sewing with a Purpose!

We are sewing with a purpose as we are learning to navigate the COVID-19 virus crisis. So far we are now under a "stay at home" order in our county. We have already been staying in as much as possible with minimal trips out for necessities only--occasional trips to the post office to check our mail and to the grocery store or pharmacy. In the meantime, to keep from going stir crazy or being overwhelmed from the constant news overload, we are back in the sewing room.
Les wearing his OVER an N95 from his construction days.

I was asked by my daughter if we could make face masks. She works in a continuing care retirement community with seniors in all levels of care from independent to assisted to convalescent in the same community. The director of clinical services had mentioned needing masks, I'm guessing during a staff meeting, which led to a discussion of my quilting/sewing skills, and thus the request was issued. As they both said, anything is better than nothing and these can help extend the life of the N95s that are so hard to come by right now by adding a cover over it and replacing as needed. We understand, and hope you do, too, that these are NOT CDC approved face masks; however, as the director of clinical services said, they are better than nothing and can go a long way to help their staff keep themselves and their patients at least safer, or to extend the life of their N95s until more become available.

I looked at a number of patterns and videos, and decided to tweak a version to suit our needs. I had read some people were adding an extra layer as a filter; however, I worried about the breathe-ability of those added layers and suggested materials. Rather than guess what a clinician might use for a filter, I made a pocket where such a filter could be added as needed. I also saw some using elastic to be hooked behind the ears; however, picking a "one-size-fits-all" length for the elastic seemed problematic. Also, in the process of being washed over and over, and going through a sterilization process, I worried that the elastic would deteriorate much faster, so I chose to add ties. Being made of cotton fabrics, these are fully washable and can be sterilized.

Be sure to scroll down for Version 2, an alternate finish with a different way to make the ties.

COVID-19 Homemade Face Mask tutorial--Version 1 

This is for a 9"x6" finished face mask with pleats and ties, and a hidden pocket to add a filter.

To begin, I took a package of double fold bias tape and stitched the length of it with a zigzag stretch stitch. Because the bias tape is so narrow, I cut 1.5" wide strips of water soluble stabilizer that could run under the tape along the feed-dogs of the machine while feeding the bias tape through the front of a braid foot, which is designed to keep a braid/bias tape/ribbon centered as it is stitched onto something. The stabilizer is very light weight, so tended to pull up as I stitched, but once trimmed off and then washed to dissolve the remainder, it didn't seem to make a difference in the stitching. By using the stretch zigzag stitch, the bias tape retains it's ability to stretch without breaking the stitches that will be important when tying them on. You could easily substitute ribbons or homemade bias tape. Get creative! Dig through your stash and find something that works for you and that will be user friendly for the recipients.


  • Cut 1 10x7" piece of good quality/tightly woven cotton. My choice is batiks or quilting cottons.
  • Cut 1 10x7" piece of lining. I'm using remnants of muslin, cotton sateen, and other leftovers in my stash. Fold one long edge of the lining piece ~3/8" twice and stitch to make a finished edge/rolled hem.
  • Cut 1 10x3" piece of lining and fold in half, press.
Sew 10x3" folded piece and 10x7" piece with one edge finished to the long edge of the 10x7" mask front, raw edges together. If you're using a one-way design/print, sew the 10x3" piece to the bottom of the mask front. Press seams towards the linings.

Cut 4 ties at 15.5" long and pin in the corners of the mask front just below the seams, sticking the end out ~1/4-1/2" beyond the edges of the face mask. These short tails will be double stitched for extra security in the next step.

Fold the lining pieces over the face mask front, keeping the ties secure at the folds. Over lap the folded lining piece over the larger lining piece, making sure raw edges are aligned along both sides, pinning to hold edges together, with the ties tucked safely inside.
Stitch down both edges of the face mask, back-stitching over the ties at each corner.


Turn the mask right-side out, pulling the ties to "pop" the corners out. Roll and finger press the side seams before heat pressing them. .

Take back to your machine and top-stitch around ~3/8" to secure the layers and encase the seam allowances inside.
With the hidden pocket edge at the top, begin folding ~1/2" pleats at both 6" edges of the mask. These pix show 2 pleats pinned and one more to do. You should get 3 fairly evenly spaced pleats. 
Return to your machine once again and stitch down the pleated edges of the mask. I stitched along the top-stitch line, turned and stitched 2 stitches over towards the center, and turned again and stitched back, making two parallel lines of stitching ~1/8" apart to secure the pleats on each end of the mask. 
The face mask is now complete and ready for a final press to set the pleats across the width.
The hidden pocket in the lining, accessible from the lining side at the bottom of the mask, allows those using it to add a filter if needed. 

***
COVID-19 Homemade Face Mask tutorial--Version 2

This is for a 9"x6" finished face mask with pleats and ties, and a hidden pocket to add a filter.

This version is similar to the mask above, only the ties are created differently.

Stitch lining pieces to long edges of face mask front as described above. Fold lining pieces at seams, right sides together to the face mask front, overlapping the short piece over the longer piece, and baste ~1/4" along short sides.
Make the three ~1/2" folds on the short sides, pinning in place.


Cut a 36" long piece of 3/4" or 1/2" double-fold bias tape (prepackaged or homemade) and mark center. Unfold and place a single layer of bias tape centered on wrong side of face mask along edge with pleats, and stitch in place, just shy of the fold line.
After bias tape is stitched in place, refold and wrap the double fold around to the front of the mask and pin in place. 
Using a zigzag or stretch stitch, stitch the entire length of the 36" long bias tape, securing the folds and the piece wrapped around the pleated face mask in one continuous stitching line.
Repeat for the opposite side and you'll have a quick finish for a face mask with a hidden pocket in the lining to add additional filters as the user desires. 


***
[Updated April 6, 2020]
COVID-19 Homemade Face Mask tutorial--Version 3

This is for a 9"x7" finished face mask with pleats and ties, and an optional inner pocket to add a filter. For this latest version, I'm stacking my layers, which in this case are fun cotton/tightly woven batik/flannel lining and then serging around them. For those who have sergers, this is a fast way to finish the layers for a quick finish if you're making lots of masks to donate.

Once the edges are serged, fold and pin the three pleats, and on you sewing machine, stitch around the mask, securing the pleats and adding one more round of stitching to secure all edges.

I've run out of bias tape and making homemade bias is, in my opinion, a time consuming pain. So, a friend was using strips of t-shirts which was a perfect solution! I have several stacks of t-shirts waiting to be cut up into blocks for quilts and I typically throw away the extra. I now have the logos cut out and ready to stabilize and have used the body of the t-shirts cut into 1.25" strips.
These make perfect ties that, if long enough, can be come a binding on the short, pleated ends with long ties in one piece. On extra large shirts, a single round cut in half was long enough to do the ties/binding on both ends of a mask.
To start, on the wrong side of the mask, center the long t-shirt strip and stitch to the mask, with the ribbing side up. When you wrap the t-shirt strip around to the front, the wrong side is up, which will help the strip turn into t-shirt rope, naturally curling into a tube for the ties. 
Once the binding/tie is attached to the back, turn the mask over and roll the t-shirt strip around the edge of the mask creating a binding. I was able to turn under the edge ~1/8 to 1/4", just enough to catch as I top-stitched the binding to the top, back stitching at each end.
After the binding is attached, at the end of each string tie a simple know. I folded the strip in half, ribbing side in, before knotting. Having the wrong side out encourages the strip to roll when pulled.
Stretch the knotted ties gently to get the t-shirt yarn to stretch out and roll.

This version is fast to make and the t-shirt ties work great! Don't cut them too narrow or they will break when stretched. I found the 1.25" width worked great and allowed enough width to apply as a binding.

For a great tutorial on making t-shirt yarn, check out https://www.craftpassion.com/recycle-tutorial-making-of-t-shirt-yarn/

To use up short pieces of t-shirt strips, I simply folded one end in, wrong side out, as if making double-fold bias tape, laid it on top of the mask corner, and stitched diagonally, reversing 3-4 times, to secure the tie in place. Again, tie a knot at the end of each tie and pull gently the strip to create the rolled t-shirt yarn.

***
[Updated May 27, 2020]
COVID-19 Homemade Face Mask tutorial--Version 3.1

We are still serging our three layers together--fun cotton front / tightly woven, high threat count sheet or preshrunk flannel inner / tightly woven batik lining. The adult masks are made 9x7" and have 3 pleats. The child size we've done is 7.5x5 as requested by the local school district for their fall mask supply or 7x6 that we made for our grandkids. Both work, so pick the one you feel will best fit your child/grandchild.
For most of our masks we are now adding ear loops rather than ties, unless ties are requested. For these we are cutting the t-shirt yarn at 7" (6.5" for kids) and sewing both ends on at the corners of the pleated end of the masks at the same time we are doing our final machine stitching around the mask to secure the pleats.
This is the ~120 child size masks with just two pleats that we made out of fun prints for the kids at the Baldwin Elementary Center to use when school starts up again. To date, we have now made ~825 masks that have been donated in and around Baldwin City, Lawrence, Overbrook, Olathe and Sabetha, Kansas, as well as to family and friends from coast to coast. 

***

I hope this tutorial has been helpful. I know there are many, many quilters and crafters out there making face masks for our healthcare professionals. Don't limit yourself to donating to hospitals. Check with nursing homes, physical therapy clinics, senior housing facilities that may have clinical staff, and so many other options where there may be a need.

Thank you to all who are helping with the COVID-19 Face Mask efforts!

More snippets from the sewing room soon...
Liz