Thursday, December 26, 2019

Favorite Tools for making Hexified Panel/OBWs

When I think about what I use to make my Hexified Panel Quilts or other One Block Wonders and their variations, I travel to a variety of places in my mind. There's the original books first and foremost, then the pattern I wrote that breaks down how to actually build around the panel. From there I jump to various rulers I've used (there are many!), the foot care department for the molefoam padding, and other notions that make life easier as I work through my projects.

This post is about those other things that make this process easier. It's not all inclusive, but a few key items that truly help. Do you have suggestions for other notions that are helpful to you?
Here goes...

GDQ Pattern and Ruler

The following items are available on my Gypsy Dreamer Quilts Etsy.com shop.


Hexified Panel Quilts -- a pattern that explains in detail inserting a panel into the color flow of hexies

GDQ 5.5" 60 Degree Triangle Ruler -- a smaller ruler that fits easily in your hand when cutting triangle sets for Hexified Panel Quilts or other 60 degree triangle quilts. Since I rarely cut strips wider than 3.25" and most often about 2.75" or smaller, many of the rulers are just too big and awkward to use. While I've used many... Clearview and June Tailor are my former favorites as they have points on all three tips, the Creative Grid and Marti Michell are my least favorites because I prefer that pointed tip on top that creates dog-ears as I sew and press seams open, and everything from 6" to 12", coming up with my own smaller version so far has been serving me well.


Favorite other tools

To discover more about the original technique, each of the books written by Maxine Rosenthal provides inspiration.

Dr. Scholl's Molefoam Padding -- used by cutting ~1/4" strips to place the full width of the line on the bottom side of my ruler to help keep the triangle sets straight and consistent. On the ruler pictured, three different sizes are pre-marked that are used repeatedly--2 3/4", 2 1/2", and 2 1/4". Discussion of how these guides were added can be found in the Tips 102 post.

Clover Roll & Press -- a handy tool to press your seams open at the machine as you go when assembling three triangles each into your half-hexie units.

Mary Ellen's Best Press -- a quilter's starch and sizing alternative. Using Best Press will give your units more body and less likely to stretch along the bias edges of the triangles. If you find you use a lot, consider buying by the gallon and refilling a smaller spray bottle.

Spray Mist Bottle -- this misting spray bottle allows you to spray your Best Press or water in a fine mist for better coverage.

There may be others that I'm not thinking of right now. I'll try to add to this or create an additional post with more information later. If you have questions on any of these items, don't hesitate to contact me.

More snippets from the sewing room soon...
Liz

Wednesday, December 4, 2019

Part 2: Tips for Hexified Panel Quilts/One Block Wonders

Tips 102: Cutting Your Triangles

As I have been rewriting and updating my pattern, Hexified Panel Quilts, I'm finding there is more information to share than what can be included in the pattern. In my growing experience in making Hexified Panel Quilts and/or One Block Wonders, I have used a wide variety of 60 degree triangle rulers. The large rulers often used with wide border prints to create the twisting triangle table runners are great for that purpose; however, they are too large and awkward for making triangles for these quilts. I've used rulers from 12" to 10" to 8" to 6", and even a couple of 60 degree diamond rulers when in a pinch! In my opinion, the smaller the ruler, the better because it fits better in your hand, and a smaller ruler takes up less space overall as you alternate directions when cutting. For recent workshops and classes, shops have had a harder time finding smaller 60 degree triangle rulers, so when an opportunity came up to create my own, I went for it!
Introducing the Gypsy Dreamer Quilts 5 1/2" 60 degree triangle ruler, GDQ-60R! After making over 30 of these quilts, I have yet to cut strips wider than 3 1/2", so a 5 1/2" ruler is plenty of space to meet my needs. The rulers are etched with lines every 1/4" for ease of measuring your marking line. These are now available on my GDQ Etsy shop for $16.
Regardless of which ruler I'm using, adding a piece of tape, photo mounting tape, or even Dr. Scholl's Molefoam Padding does the trick of keeping my cuts straight and even along the strip. My absolute favorite is the Molefoam Padding. It comes in the foot care department with two ~3x4" squares per package. The thickness of the molefoam, as opposed to the thin moleskin, is similar to the thickness of your six layers of fabric being cut to form triangles for your Hexified Panel Quilts or OBWs. As I get ready to cut my triangles, I first cut a long piece off one edge--I'm not overly particular about how wide the strip is as long as the cut is straight.
Then I line up one angled edge of my triangle ruler, wrong side UP, with the 60 degree line on my 6.5x24" ruler. I place the point at the mark for the strip width I cut (in this case 2.25"), and then place the strip of molefoam along the triangle ruler at the strip width line, snugging it up against the edge of the long ruler. Once the molefoam strip is securely place along the bottom of the ruler, I trim the strip to match the width of the ruler.
Given that we are cutting multiple layers, having the molefoam extend to the edges of the ruler help to box in the triangles as you cut them. Without this guide, as you cut, you may find the layers tend to spread out and cause wonky corners. Boxing them in with the molefoam helps minimize this problem.
Immediately before cutting my first set of triangles, I check the layers of the strip to be sure everything is matched up. If one or two layers are off more than you would like, you can micromanage them, only along the length of the strip, by shifting the layers individually until all are matching to your satisfaction. For me, unless it is 1/4" or more off, I tend to leave them alone as they still blend beautifully when sewn into hexies. 
You're now ready to start cutting your triangle sets. Place the ruler at the desired place at one end of the strip of six layers. On this photo I chose to place my ruler where the frame around the panel will be hidden in the seam. I could have as easily moved it to the left, so long as I have it no closer to the end than where the shortest layer ends. You want every set of triangles to be complete with tips on all three corners.

After you make your first cut and set your first set of triangles aside, alternate the direction of your ruler as you cut back and forth across the length of the strip. 
The half-triangle on each end will be your only waste. The partial triangle on the right looks large enough to use; however, that is the selvedge end. Using that as a set of triangles could cause problems as the selvedges are woven differently and can add extra bulk to the seams. 

The number of triangle sets you will get from a strip will depend on the width of your strip. This strip was cut at 2.25" and yielded 14 sets of triangles per 22" long strip. Wider strips yield fewer triangle sets, whereas narrower strips yield more. A typical 2.75" strip (my favorite strip width for full WOF panels) that is 22" long will yield ~12 sets of triangles. Each row is then stacked with the direction of each set alternating, making them easy to grab to sew.

If you want to keep the sets together in case of disaster (kids, pets, wind, etc), you can certainly pin each set together and store them in a large Ziploc bag.


Extra Tip! Fussy Cutting Triangle Sets

There may be times when you want to keep certain elements of your panels to include in your hexies. Whether it means adjusting your cut across the middle of the panels to either side of the natural fold from the bolt in order to retain elements in the center of the panel, or moving your triangle ruler to include special elements along your strip sets, you have the choice of how our quilt is cut up. Don't be afraid to experiment to get what you want for your layout.

On a subsequent strip I came to a hummingbird that I wanted to be sure was included in my hexie collection for this layout. I chose to fussy cut and lose a little in the middle in order to get as much of the hummer as I could. 
I cut the triangle sets until I got close and then stopped to move my ruler over to see where I needed to be to include the hummer.  
I cut the hummer triangle set and then went back to the previous section and cut the flower triangle set, leaving a strip between them that is now waste. Since the strip was a little longer than I needed due to the extra frame at the end by the selvedge, I was still able to cut 14 sets of triangles from this strip. The final partial triangle piece was reduced by the amount of that strip between triangles. 

You're now ready to go to the sewing machine with a stack of triangle sets and get sewing! Part 3 is coming soon with tips on keeping a consistent 1/4" seam and more.

More snippets from the sewing room soon,
Liz

Tuesday, December 3, 2019

Part 1: Tips for Hexified Panels/One Block Wonders

Tips 101: Layering and Cutting Strips

I've have spent the last couple of weeks rewriting and updating my Hexified Panel Quilts pattern. As a result, I find there are loads more tips and tricks that could be helpful to those making Hexified Panel Quilts or One Block Wonders. Having made over 30 Hexified Panel Quilts and/or One Block Wonders, it seems appropriate to share some of tips that are helpful to know when going through the process of making these one-of-a-kind quilts. From layering and cutting your strips, to cutting the triangles, to assembling them into the units ready for design, there are numerous steps that can make or break your success, as well as test your patience. This series of tutorials is meant to help you through some of those steps and make the process easier and smoother.

It has been nearly ten years since I made Strutting Peacocks, my first One Block Wonder. Oh my, how much I've learned since those early days!

Cutting your panels

The first thing I've learned is imperative to making a successful OBW or Hexified Panel Quilt is to be sure all of your panels were cut from the same bolt. Several times at workshops I've had students come in with panels they purchased on the internet, 3 panels from one vendor and 4 from another. Invariably, the panels from two different bolts do NOT match up properly and can cause a number of problems. Not realizing I would have a perfect example just hours before writing this, I had planned to just explain why it makes a different.
However, as I was cutting panels for a sample last night, I only had four on the end of one bolt and went to the closet for a fresh bolt to cut three more. Since I had ordered from the same company on the same day, I presumed they would work together just fine. However, they were obviously quite different! If you look at these two panels--one folded and placed on top of the other, the selvedges on the right are quite different, and the blocks themselves don't match up. Also, the colors on each are enough different that it would be obvious if I combined three from each in a single hexie. The first bolt was quite vibrant, while the second bolt was a little more washed out. Once I discovered just how different they were, I cut 3 more from the new bolt and set the four orphans aside for another project. Just like checking that all skeins of yarn for a project are from the same dye-lot, purchasing panels from the same bolt holds true for similar reasons.

For those using full width of fabric panels, rather than wrangle 44" long strips and try to keep them aligned, I cut the panels in half at the fold before I start. Our most common rulers are only 24" long and our cutting mats typically no longer than 36", so trying to cut a 44" long strip is awkward at best! Working with two stacks about the size of fat quarters makes it much easier to handle, and the 22" WOF strips are easier to keep aligned as well. There has been much discussion about the loss of extra hexies when doing this; however, you will only lose one hexie per strip, which isn't much in the big picture. A 24x44" panel cut at 2 3/4" can yield ~12 sets of triangles per 22"/half-WOF strip. Multiply 12 sets x 8 strips across the 24" panel and for just half of your panel you get 96. Double that for both halves of your full WOF panel and you get 192 sets of triangles! Losing 8 sets by cutting the panel in half is minimal waste and makes the process so much more manageable! 

When pinning, I prefer to add my pins oriented long-ways along the long edge of the panels, using only flathead pins. The flathead pins make it easier to place your ruler down on top of them, without causing the ruler to rock as it might when placed on top of pins with round heads. I typically cut my strips width of fabric as there is just a hair of ease when stretched, whereas there is no ease along the length of grain. I've found that little bit of ease is very useful when assembling your units into rows as bias edges of some triangles meet straight edges on other triangles in the assembly process.  
Overall, I've had good luck using minimal pins--sometimes only 2 or 3 along one edge--when lining up my panels; however, these blocks, once all layers were cut from the same bolt, still gave me fits. I lightly sprayed every panel with water and pressed them to get the creases out that they had developed while rolled on the bolt. Even then, two layers in particular were stretched more than the others and resisted laying flat and staying aligned. I ended up using multiple pins across the fabric and down both edges and, spraying the stack lightly from the wrong side (pins down on the board), I re-pressed the stack as a whole while pinned to get them to behave. With a little extra encouragement (and patience!) I was able to get them lined up, removed most of the pins, and trimmed one long edge back to where all six layers were all even. I chose a spot ~1/4" from the edge of the block frame so the frame background would be hidden in the seams. 
I then measured from that cut edge, across the narrow width of the panels, to find out how many usable inches I had to work with to cut strips. I don't trim the opposite edge of the panels as any extra may be needed to assure all strips can be cut without the last one being short. I chose 11 1/4" as my usable amount and began dividing by various possible strip widths until I found a measurement that would give me the most number of strips with the least amount of waste. In this case I could get 5 strips cut at 2.25" and the little bit left untrimmed on the left side would be enough to assure I got all five strips at their full width.

NOTE: When cutting fabric, there will always be bits of fibers left over, similar to the sawdust left behind when cutting lumber. Even if you cut each strip accurately, the placement of your ruler and any twist, as well as the width of the blade, can cause a fifth strip to possibly come out short. For example, if I have exactly 8" of usable fabric with no remnant and want to cut four 2" strips, I will choose to cut 1 7/8" or slightly less per strip to give myself a little leeway. Leaving the extra on the untrimmed opposite edge, gives me a little space for minor errors without shorting the final strip. 
To begin cutting and being right handed, I turn my stack of six layers around so I can use my ruler to accurately measure my 2 1/4", using a piece of rubber shelf liner under the ruler to help prevent shifting. I proceed across the stack, cutting rows until I'm at the far edge where the small amount of leftover will be trimmed away. The first strip was trimmed and set aside before the rest of the strips were cut, so the second picture shows only four of the strips and the leftover waste. 

As each row is cut, I double check to be sure the print is still aligned nicely across the strip on all six layers. As long as they are very close, I don't worry about small anomalies as they won't be noticeable once the triangles are cut and assembled. Remember, these are triangles, so the print won't be matching up on triangle edges as they might on square piecing.
At this point you're ready to cut your triangles, which moves us on to tutorial Tips 102 for Hexified Panels/One Block Wonders.

More snippets from the sewing room soon,
Liz

Friday, November 29, 2019

Dresden Hearts!

I'm in the process of making 12 unique Dresden Heart blocks for a block swap group that I'm part of that boasts members are from across the US, Canada, and New Zealand! It's such fun being part of a swap--you get to meet people who share a common passion for quilting. The group has evolved over the last several swaps since I first joined in 2014. The swaps I've taken part in include star blocks, churn dashes, Christmas block of choice, and now we're making Dresden Heart blocks, each in the color choice of each recipient.


The pattern chosen is a free download from Quilting Up a Creek and can be found at http://quiltingupacreek.com/freepatterns/dresdenheart.pdf. The directions are fairly general, so having one option broken down into steps could be of benefit to those who have little experience making Dresden plate blocks. This is by no means "The" way to make them, as there are several ways to get to the same result. I took my experience making and teaching appliqued Dresden plates, and have adapted the pattern to my favorite technique using a foundation for the blades. There will be tips included on how to make this block with a stay-in foundation that will wash away to nearly nothing when the quilt is completed and washed. 

Other than a variety of scraps in your color choice, a working sewing machine with 1/4" foot or guide, and neutral thread, other supplies you need are:
  • Paper scissors to cut out pieces
  • Rotary cutter & mat
  • Pinking shears 
  • School Glue Stick (to glue blade templates to the paper master to be copied)
  • Tear-away stabilizer, my favorite is Ricky Tims' Stable Stuff, two (2) 8.5x11" sheets
  • White glue, my favorite is Roxanne's Glue-Baste-It in the squeezy bottle

A note on these last two items before we jump in...


Ricky Tims' Stable Stuff Polly is an amazing stabilizer that you order directly from Ricky's website. You can trace your designs or it can be run through your inkjet printer, thus reducing the time needed for prep and tracing your pieces. For this project, I made one master sheet and merely need to copy it onto 11 more sheets to make the remaining blocks for my swap. It has enough body to it that you can fold fabric edges around it and glue in place, and when you're done it can be either torn away or left in to become a soft layer of unnoticeable polyester fibers inside your project. For this project, it worked exactly as I had hoped and was so easy to use!

The Roxanne's Glue-Baste-It EZ Squeeze is perfect for any applique project. This glue is 100% water soluble, dries clear, and stays soft in your project until it washes away. The EZ Squeeze bottle has a long tip that allows you to place tiny dots of glue where you want them with little or no mess. This product is available at many quilt shops, online quilting distributors such as Nancy's Notions, and elsewhere.

This tutorial now gives you a series of steps to create a Dresden Heart that will later be appliqued to the background block with the applique technique of your choice. This is the "prep work" steps to making your Dresden Heart.


Start out by printing three copies of the original PDF pattern at actual size--one to keep intact for reference. Cut sets of blades from the other two copies, cutting close to (maybe 1/8"away ) the stitching/solid line. [Tip: Because all lines are straight for the blades, I used my rotary cutter to cut out the pieces--much faster and nice straight lines.] The two sets of blades are arranged on a single sheet of 8.5x11" paper and glued down with a glue stick [think of it as a puzzle without a box].
Copy this "master sheet" of parts onto a single sheet of Ricky Tims' Stable Stuff Poly in an inkjet printer. [Tip: Remove the paper from the tray and insert just a single sheet of the Stable Stuff for copying.] Once you have your copy, mark one set of blades with an R next to the number so you know they need to be placed in reverse or mirror image to get a set of blades in Left and Right orientations.
Select your fabrics and using Mary Ellen's Best Press or other starch of choice, press all for a nice crisp finish. As pieces are placed for a scrappy look, make sure to randomize them putting a L and R for each piece on different fabrics. Lightly glue around the edges of the blades and lay them on the wrong side of each piece of fabric. Use your iron to heat set the glue to hold it in place for the assembly process. The glue is water soluble, so will easily wash out when your quilt is complete. Cut them out placing the ruler's 1/4" line on the edge of the trimmed foundation so the 1/4" seam allowance is added all around each piece.
Fold & glue the top edges of each piece down, heat setting with your iron as you go. This holds your folded edges in place for nice finished points on your finished block.
Lay out all of the blades before sewing to see how everything looks, making sure you have all of the pieces. Sew them together in pairs, then quarters, then halves, and finally into the finished heart. When stitching the blades together, align the bottom edges (that were cut 1/4" from the solid line), and start all stitching at the outside point edge of the blade, sewing towards the center. As the pieces are asymmetrical, check to be sure the pieces align at the top/point ends at 1/4" for a nice join and back-stitch 2-3 stitches to hold the joins in place. Your scant 1/4" seam should not touch the Stable Stuff foundation, but be just a hair away on all pieces. 

Trace the heart on the solid stitching line onto another piece of Ricky Tims' Stable Stuff. Cut out the stabilizer heart on the traced line. Lightly glue around the edges of the Stable Stuff heart and place on wrong side of your center fabric choice. Trim the fabric with pinking shears just under 1/4" from the edge, leaving a pinked edge fairly close to the Stable Stuff heart. Clip once at the top center of the heart and, working slowly, fold the pinked edges of the fabric over the Stable Stuff heart, gluing in place and heat setting as you go. This step leaves a finished edge all around the heart.

Place the heart on the Dresden Heart, centering the top and bottom, and lightly glue in place, heat setting to hold in place until you have stitched it down.
At this point you have the option of utilizing the "tear-away" function of the Stable Stuff and removing a majority of the stabilizer before applying to your background block--it will remain under the folded/glued top point of each blade. [On my sample, the printed numbers and the added R on half of the blade foundations were dark enough they were showing through my light fabrics. Another time I will use a much lighter pen/pencil to mark the pieces so I can leave the foundation in until complete.]

The heart is now ready to be appliqued down onto the background block. Cut the background block generously, ~1/2" larger than the pattern instructs, as the process of stitching the applique down may draw up the background. [Optional: Add a fusible lightweight stabilizer to the back of your background block. This will give your background more stability as you stitch the applique to the background.] This block was cut at 13" and after the heart is completely stitched down it will then be trimmed to 12.5". Lightly fold your background into quarters so you can align your applique centered on the fold lines. Once again, lightly glue around the edges of your applique and heat set onto your background block.

You now have the option of hand appliqueing the heart center and Dresden Heart, zigzagging with your machine with invisible or matching thread, or using a blanket stitch or other decorative stitch on your machine to stitch it down. Choose the applique technique you are most comfortable with for your finish.

I hope this tutorial has been helpful! The Dresden Heart is a darling block to make and, now that I have my master sheet made and know the steps to take, the rest of the blocks will go much smoother. Even teachers learn from doing and hopefully can pass along tips that will make it easier for others.

More snippets from the sewing room soon...
Liz

Monday, September 9, 2019

Watermarking your images to help preserve ownership of your work


There has been some serious discussion lately on a couple of closed groups on Facebook where members have "stolen" images posted by members and shared those images on other platforms (Pinterest in particular) as their own work. The groups are closed intentionally to make it a safe place to share our work with others. These images were not intended to be shared elsewhere without our specific permission and certainly not to be shared with other groups or on other social media sites by people claiming to have made the items! Members have been blocked and banned from re-entering Facebook groups when reported or caught because of this misbehavior. 

As quilters/artists, we need to be proactive in this situation. One way we can combat this behavior is to watermark our photos either with free apps in our phones, internet sites that offer free watermarking, or in programs on our computers before posting them. There are dozens of free apps available for both iPhone and android phones, internet sites online where you can add a watermark for free, as well as a variety of programs for your computer. It doesn't take long, and in the end we will hopefully find fewer people taking photos of our work and passing it off as their own. 

If you search for "watermark" in your app store, you'll find dozens of options. Similarly, if you Google search "add watermark to photos for free" there are numerous sites where you can mark your photos online from your computer. I'm sure each app/site has its quirks, pros, and cons. If they're free, try one and if it works for you, keep it. If not, uninstall and try another.


There are a variety of ways to add text to your photos using programs on your computer. Some people have access to Photoshop which is a powerful photo editing program that allows you to add text to your images. There are other photo editing software programs available--check what you have to see if you can add text/watermarks to your images before sharing them.

I use Roxio PhotoSuite, which I purchased several years ago. Among many other features, I can add text to any image and then "flatten canvas" after adding text to the image, which merges the layers together and makes it difficult to remove a watermark/text. 

Whatever you use, if you don't want to see your quilts/artwork on Pinterest with someone else taking credit for making your masterpiece, please take a few minutes and add a watermark to your images before you post them! 

A free online site is Watermarkly.com. It offers free watermarking of up to 50 photos at a time in batches online. It has an easy "Upload" or Drag/Drop function to add photos for watermarking. I used it to add a watermark to this piano mini hexified panel quilt in just seconds. It does add a Watermarkly logo (visible in the lower left corner of the image) for each image marked with the free version. You can upload images from your computer, Google Drive or Dropbox for quick watermarking of multiple photos. There are reasonable offers to purchase a one-time life time license for Watermarkly for professional use that includes a desktop companion, which does not add their logo. Regardless which version you use, there are hundreds of fonts available and your watermark is completely customizable. It was very quick and easy the first time I used it!

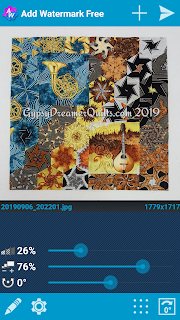
Since many of the photos I watermark are done from my phone, I have found AddWatermark, a free app by Androidvilla, to be more than satisfactory. I've been using the free version on my android Galaxy 6 phone for several years. I've recently purchased the full version so I can add my own image/logo to my photos and will be experimenting with it soon! 


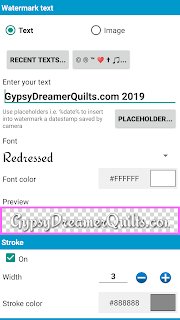
When you first launch AddWatermark, you have to set up your preferences by clicking on the little gear at the bottom of the opening screen. 

I chose to add text to each image; saved the default to add "_wm" to the file name so I'd know it was watermarked; chose to create a custom folder named "addwatermark" that is easy to find in my gallery list of folders; and selected to save the images as JPG format. After completing the items on this screen, I clicked on the pencil icon next to "Text" to take me to the screen where I could customize my watermark. I first entered the text I wanted to appear on each photo; chose the font I wanted it to be in; selected a color; and the initial font size.


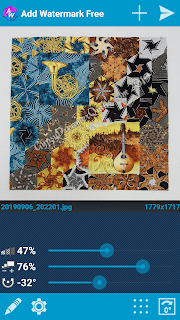
Next I went back to the opening screen and clicked on the + at the top of the screen to add a photo from my gallery. The text I initially entered automatically appears on the photo I load. I then have the choice of moving it around, making the text larger or smaller, or changing the transparency or angle of the text using the slides at the bottom of the screen.

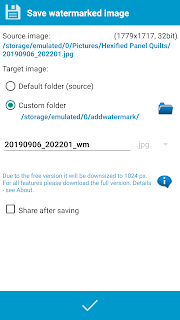
Once I'm happy with the watermark, I click the right-arrow in the upper right corner. This takes you to the "Save watermarked image" screen. You can choose to set up a specific folder for those images so they are easy to find or have it save in a default folder. I chose to create an "addwatermark" folder so these images would be easy to locate. 


Once saved, when you are ready to upload an image, you just open your Gallery, select the "addwatermark" folder, select the image you want to share that is watermarked specifically for you, and upload to Facebook, Instagram, or other social media site. Easy peasy!

As a reminder, you control who sees your photos on Facebook. On your own page, when you initially add photos, you can select whether to have them visible to only you, your friends, friends of friends, or public. Choose wisely, especially if they are not watermarked.

I hope this information has been helpful to you! The internet is a large space occupied by many, many people, some of whom don't have your best interests in mind. Keep your work safe by taking the steps listed above and adding a watermark of text or logo to your images before uploading them for the world to see, even if it's in a supposedly safe, closed group! 

More snippets from the sewing room soon...
Liz

Sunday, June 2, 2019

Twisted Blocks Add Fun Texture

I just completed a wonderful project that incorporated the works of three artists--my friend Susan who created a very special anniversary quilted wall hanging; our friend Nancy who used that quilt as a backdrop for a still-life painting; and myself who created an original design quilted wall hanging that incorporated their projects into my own. The full reveal is coming real soon! The quilt was just delivered to be included in the judged quilts at the upcoming Kansas City Regional Quilt Festival and as soon as judging is complete, I'll be posting that quilt everywhere.

These are a few of the blocks that I added to the quilt that were different from my norm. The same blocks were used in the original quilt by Susan and I chose to add them to my project to tie the piece together. I've been asked for a tutorial on how to make these blocks and so here it is!

I call these twisted blocks, although they may be known by other names as well. I've used a similar layout in a larger size to make coasters (see the bottom of this post), so they aren't necessarily a new thing. It's just the first time I've put them into a quilt!

For this particular quilt I wanted smaller blocks similar to what Susan had used, so I started out with five 2.5" squares. One became the foundation for the rest that built in layers.

First, fold and press well four of the squares into triangles and lay them out around your foundation square. If you look at my layout, you can see where each square will be set into a corner of the foundation with the raw edges together on two sides and the folded edge diagonally across the foundation.
Continue adding the pressed triangles until three are on, working your way around the block.
To add the fourth triangle, fold the corner of the first one up and slip the corner of the fourth one under it and leaving the other end on top of the next triangle so the triangles are "woven" together. I pinned the first two triangles in place on the foundation so they wouldn't slip while I worked the fourth one in.
I added a drop of Elmer's white glue to the corner of each triangle to glue it to the foundation square in the four corners. Since I was working with smaller squares, adding a lot of pins wasn't feasible, so a little glue that was heat set with a hot iron did the trick to hold the pieces in place until they were all sewn. Once all four triangles are in place securely, I cut and stitch 1" borders on either side and then across the top and bottom.
I prefer to work with a seam guide of some sort--this seam allowance guide is attached to the machine with double-stick tape and placed along a 1/4" seam guide for proper placement. It helps keep my seams all consistent as I stitch. 
Once the borders are on all the way around, I then begin folding the bias folded edges back to create curves. Working one at a time and being sure the bias edge is folded back even underneath the next piece above it, I finger press each curve down. 

When all four seams are finger pressed, I then go to my ironing board and give them a good press to hold them in place. The result is a gorgeous little block that will add texture and movement to your project.

On my larger quilt I added these blocks as part of the border. The final step was to add some quilting to the blocks. I top-stitched each curve down on the exposed part of each curve, being careful to keep the curves in place even underneath the overlapping pieces. I also ditched around the center block and added some little curls in the frame. It really dressed up the quilt and tied the projects together to create Three Artists in Bloom: a quilt of a painting of a quilt.

Stepping back to 2012, I realize I used this same block. Using 5" charm squares, I made several sets of coasters for stemware. I pressed four charm squares into triangles, added them in the same manner to a base of a charm square, a piece of stabilizer, and another charm square. They were stitched together and turned inside out making a finished edge. I top stitched around the edges to keep everything in place. Instead of folding the bias edges back and stitching them down, instead I left them loose and the base of a wine glass can be tucked inside for a "take-along" coaster! 

At the time when I made these, I thought it was brilliant, but never imagined incorporating these blocks into a quilt. Now that I've taken that leap, I suspect you may see them again in future projects.

More snippets from the sewing room soon,
Liz