What to do with another fabulous set of panels from
TimelessTreasures? Create another hexified panel quilt, my twist on the original One Block Wonder technique, of course! This new adventure began when two of my quilts including my Poppy Explosion, a quilt made with one of Timeless Treasures' fabrics, appeared in
One Block Wonders of the World. I was first
approached by Joy at Timeless Treasures in late October 2017, soon after the book's release, and asked if I would make two hexified panel quilts for them to be featured on their blog and in social media. Of course I agreed! From the options they sent me, I selected two different panels, both designed by Chong-a Hwang, one of my all time favorite fabric designers.
In The Garden, made with the Reverie line, was completed by Christmas and was featured on their January 8 blog post. Quilt #2 was scheduled to go live on my blog by the first week of February, so on January 3, I dove in fresh as I pulled out the next
set of panels, Chong-a Hwang’s Tuscan Poppies, and started cutting. Oh my goodness!!!

I went through the same process of layering the panels,
cutting strips, and sub-cutting 60 degree triangles as described in the
January 8 blog post for In The Garden. On this full width of fabric panel, I again cut the six panels in half near the fold, so I would have two sets of six layers approximately 22"x24". I placed a pin
through the point of the same leaf shown below on each of the six layers near the selvedge end, and in a similar spot near the cut end of the first set of six layers, so all of my
strips would be as perfectly aligned as I could get them in order to make great hexies. I repeated the same process on the other half of the panel layers.

Once lined up, each set of six layers was trimmed on one edge, and
then strips cut at 2.75”. I prefer this strip width because it makes the
finished hexies small enough to focus the color from the print, as well as
create a large number of hexies to play with in the color flow layout. This
particular panel yielded 192 sets of six triangles or a total of 1152
individual triangles! Because we had a deadline by which to complete this quilt, my husband, Leslie, also an amazing quilter, worked with me in tandem to get the units made. We each cut strips and triangle sets to speed up the process.
The hexies were stacked in sets of six layers as
they were cut, alternating direction, so they would be easy to grab as we began
the process of auditioning layouts and sewing the half hexies in sets of
three triangles each.
As always, we auditioned the 3 layout
options for each of the 192 sets of triangles that would become hexie units.
Picking which layout option to use as the final look when sewing the units
together can be time consuming. A variety of things are taken into
consideration when we pick a layout. In this case, the block on the left would read black/dark with the dark star center; whereas, the block on the right would read red with a flower center. We try to keep in mind what decisions we made
previously and create the units with enough variety that there aren’t too many
of any one type of design. More variation makes for a more dynamic layout in the end.

The sewing was, once again, all done on
our Singer Featherweights. Glennie-Marie, my 1936 Singer Featherweight, has the best stitch quality of
any of my machines and just purrs! Les's Featherweight, Ms. Lacey, is named after his granddaughter whom he learned to quilt for and is his go-to machine for piecing. We both use a stitching guide set 1/4" away from the needle so all of our seams will be uniform. My preferred guide is a narrow strip of Dr. Scholl's mole foam pad stuck down to my machine. The mole foam pad (found in the foot care department of your local pharmacy) is about 1/8" thick, so provides a raised guide to run your fabric pieces up against as you stitch the seams.

Once all of the half-hexies were made and halves pinned
together, I put the single uncut panel up on the design wall and started
building the structure of the frame around the panel. I place all of the hexies
with the centers aligned vertically so they will line up next to each other
in horizontal rows, and nest alternately in vertical rows. This makes pinning and sewing
the long vertical columns of half-hexies together much easier in the assembly
process.
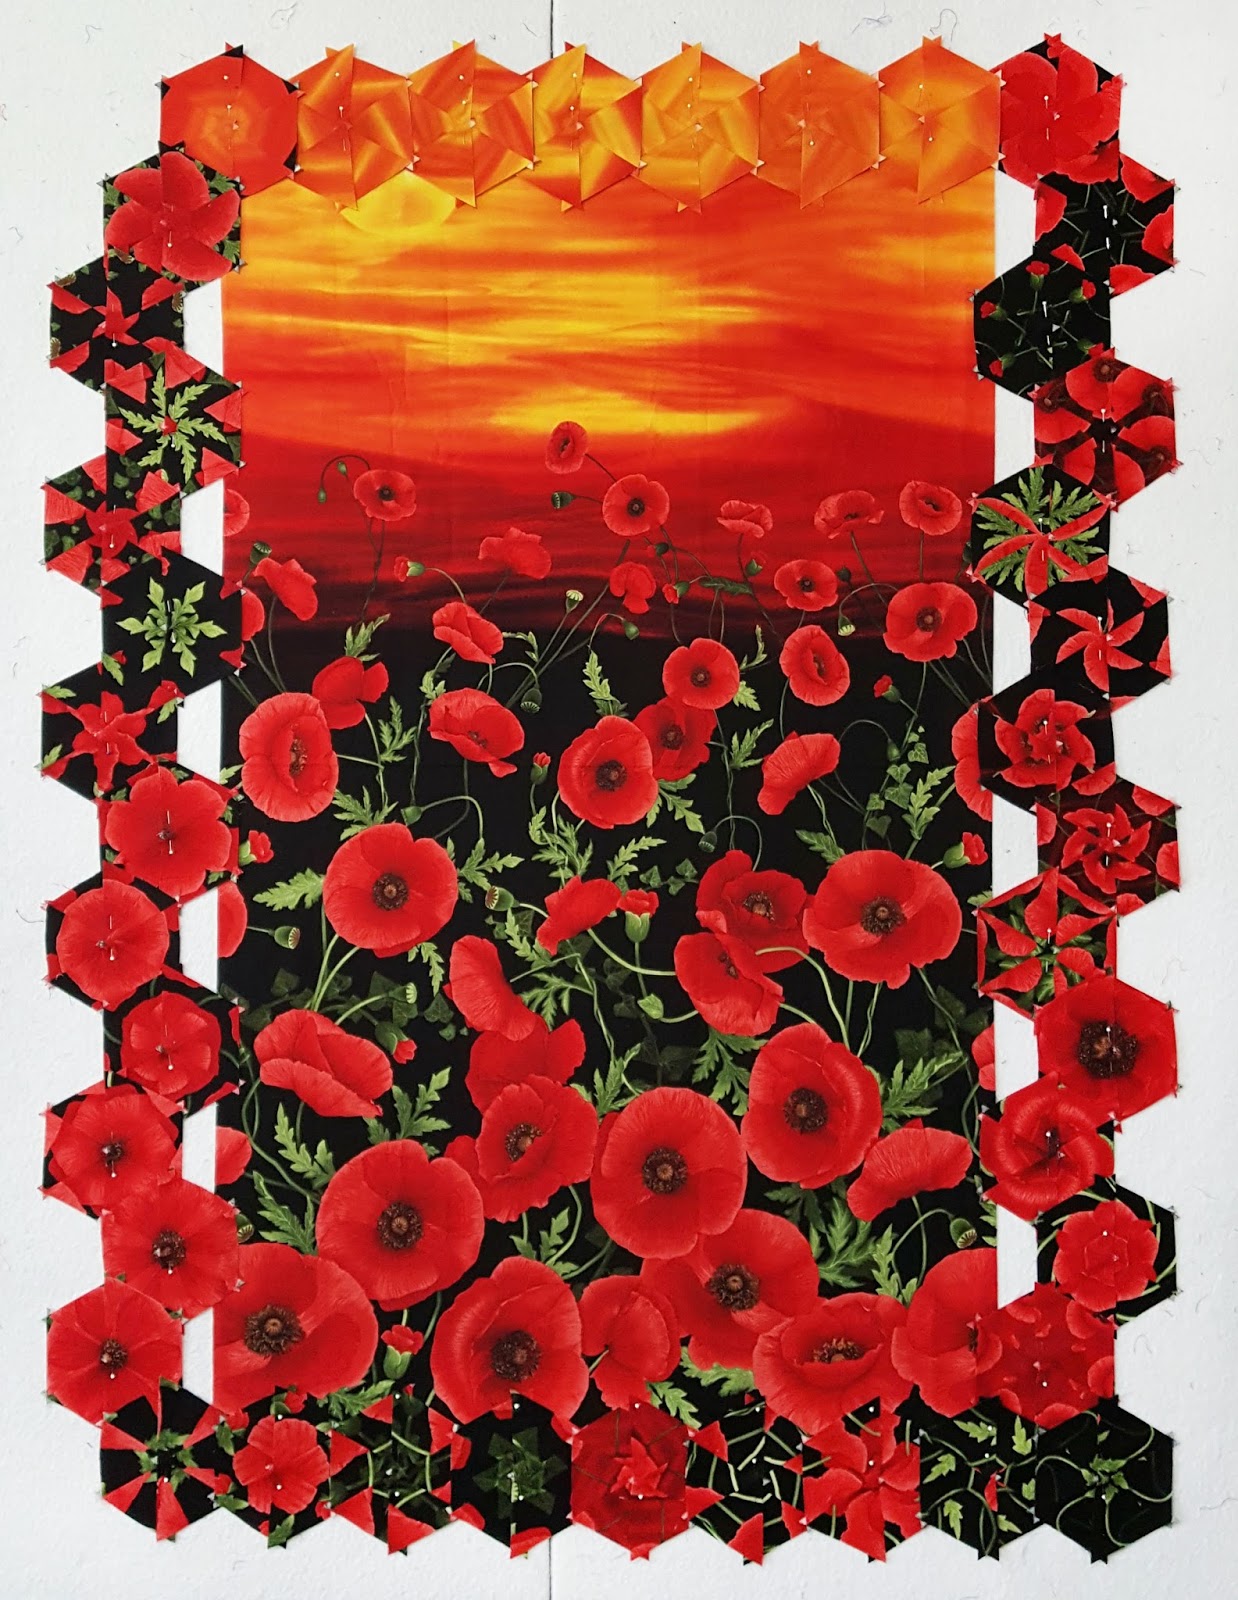
Once the frame is complete, then I begin placing
all of the hexies around the panel without doing too much in the way of
organization. I just want to see everything I have to work with. The notched
edges around the panel will eventually be filled in with half-hexies to make
the inner rows straight. Also, halves will be removed on the outside rows to
make the outer edges straight before finishing. This is done after the layout is complete and
I’m done moving hexies around to improve the color flow.
Now it’s time to really play and begin shuffling the hexies
to create a dynamic layout. As I started moving units around, I found that I
was coming up with a design very similar to In The Garden with her angular lines. I wasn’t really happy with it becoming a
different version of the same layout, but wasn't sure what I wanted it to look like.

Les agreed it was too similar and had definite ideas of how to change it. He is a retired ceramic tile installer, so he visualizes mosaics in ways I can't even imagine. Before he started shuffling hexies, he asked me
maybe twice or three times, “You’re sure it’s okay. I’m going to tear it apart.
You’re sure.” Apparently I’m not as accepting of his critiques as I thought I
was. 😊 I agreed, trusting him to come up with something unique and amazing. I
watched him begin his design process, moving hexies around to create a more
fluid color flow. After shooting just one picture of the transformation into
softer, flowing lines, I left the room so he could work in peace.
When I returned a couple of hours later, it was completely different and utterly
amazing! Together we looked, snapped a picture, worked more, snapped
again. Moving one hexie at a time until we finally were satisfied with the layout and
called it complete.
Once the layout was done, the stitching
began. Long columns were sewn, then those rows were sewn together into sections,
as well as the short sections above and below the panel. Here one of the stitched sections is being pressed before going back on the design wall. All units are pressed
with BestPress starch alternative throughout the assembly process--first as half-hexies, then in individual rows, and finally in sections, in order to give the top good structure so the many bias
edges won’t stretch.

Here you see each of the sections sewn together except
for the final two columns on the right side. Once that section is complete, the next step will be to trim the zig-zag edges off of the bottom of the top section and the top of the bottom section, and then attach them to the top and bottom of the panel. The top section is typically stitched onto the panel first. Before stitching the bottom section on, the center section is put back on the design wall where the adjoining hexies are lined up between the center and two outside sections, both at the top and at the bottom. Once the matching half-hexies are lined up, the bottom section is marked for cutting 1/2" above the bottom of the panel, which allows for the two 1/4" seam allowances when sewn together. When the bottom section is stitched on and pressed well, the completed center section goes back on the design wall to confirm all of the matching parts fit properly before sewing the long seams to complete the top. Matching half-hexies above and below the panel are pinned together first to assure all of the hexies will be complete, and then the panel is pinned to the remaining hexies on the side sections.

Once the entire top is together, a 3.5” black border was added to
frame the entire top. This quilt did not get the flange frame around the panel that we have used on previous quilts.
Now it was time to pin the layers and begin the quilting
process. The quilting would be done by me on my HandiQuilter Sweet Sixteen sit-down machine. Since no frame is involved, all of the projects I quilt are pinned. The quilt is moved under the needle to create the quilting motifs.

This quilt called for
something completely different in the way of quilting. On my previous hexified panel quilts, I have quilted orange peel/gentle curves in the hexies themselves, and thread painted the central panels. Because Les created a dynamic layout that blended the panel with the hexies so seamlessly, we decided not to add a flange delineating the panel from the hexies. The quilting would need to blend the panel in with the hexies, working with the softer and more flowing layout design. After some experimenting with an 18" square of plexiglass laid over the quilt top that we could draw on with dry-erase pens to audition quilting designs, we decided the green and
black flows would have swirls, and the flower cluster hexies would have rippled
petals with star centers. Across the top in the sunset section, swirls were
quilted across the panel and hexies, blending two colors of thread that shifted
in color across the area so the colors blended and complimented the color flow
in the quilt top. Being a busy top, showing the difference in the quilting
designs on the poppies and leaves from the back shows better the direction I
was going.

I drew from my growing collection of polyester quilting and machine embroidery threads for this project in order to get all of the colors in that I wanted. Included were 8 shades of red/orange/yellow and 3 shades of green selected from Glide, Floriani, and Madiera threads. As I was quilting the swirls across the sunset with two threads through the eye of the needle at a time, I found after I was done that in several places one thread had "slipped" and created a small thread nest on the back. Rather than rip them out and risk breaking up the flow of the swirls, I decided to leave them and consider them part of the character of this particular quilt. Not every thread or combination of threads will work perfectly. My tension was good, so I was satisfied with the results despite these little glitches.
On the panel, all of the flowers, stems, and
leaves were outlined in matching colors, and the black background was quilted
with black 100 wt Invisafil thread with a small stipple.
Finally, texture and accents were added to the flowers
in two colors of red to add depth and dimension to the poppies.
To finish, we decided to add a flange to the binding. I
stay-stitched the quilt layers together around the outside of the black border, and
then marked a chalk line about 3/8” in from the edge. I used this line as a guide
when stitching the double wishbone motif in dark green thread around the black border.
When the binding was sewn on and hand stitched to the back, the front binding and
flange were placed perfectly to still expose the entire of the border quilting.
It was finally time to put the finished quilt up
on the design wall to see the finished product! To say we are pleased is an
understatement. When I first chose the Tuscan Poppies to be one of the two sets
of panels I would make as samples for Timeless Treasures, Les was truly not so
sure about this panel. He just couldn’t visualize it initially. However, giving him the
opportunity to create a beautiful flowing design, it has now become one of his
favorites!
Despite it being a cloudy day when we finished, we went out to
the Baker University’s Lister Stadium in Baldwin City, Kansas, to take some
pictures. Built in the mid-1930s by young men who worked in exchange for university
tuition, the stadium features beautiful rough hewn stone walls surrounding the
entire stadium area. A sunny day would have given us better results, but we are
still pleased with the way the quilt looks against the stone walls of the
stadium.
We waited a couple of days for the sun to shine again, and were rewarded with gorgeous color and texture on these close up pictures of the quilting. You can
really see the thread painting on the floral panel, as well as the swirls and rippled
petals quilted in the hexies.
Seeing the texture of the quilting from the back gives you a true sense of the level of thread-painting done to enhance the panel, while still blending in with the surrounding hexies.
This final picture is a closer detailed view of
the bottom half of the quilt showing the color flow with quilting, the double
wishbone border quilting, and the two-tone flanged binding.
A final note. One of the interesting things about making a hexified panel quilt or any variation of the One Block Wonder technique is that not every hexie gets used. The layout may be such that there is an uneven number of hexies and using them all won't make complete rows. Other times, a few hexies might not blend color-wise and get left out, or there may be too much of one color to make a balanced design. Sometimes just a handful remain, yet others a large number are not used. When the design of Tuscan Poppies was complete, 38 hexies and 10 orphan halves
were left over. These are being saved and a future project is already being planned that will be shared soon.
My sincere thanks go out to Timeless Treasures Fabrics once again
for inviting me to be a featured quilt artist on their blog! Being able to
create such amazing works of art and share them with the quilting world is a true
blessing.
More snippets from the sewing room soon,
Liz