Tuesday, November 15, 2016

Celebrating 50th anniversaries with memory quilts

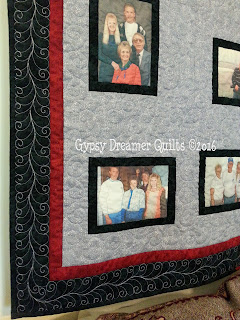
This year I was honored to create two commissioned memory quilts for my friend Mary and her husband. The first was for one brother & sister-in-law, Jerry and Edna, honoring their 50th anniversary that was celebrated in June. The second was for another brother & sister-in-law, Richard and Mary Jane, honoring their 55th anniversary that was celebrated in August.

Both quilts included photos transferred onto EQ Printables premium cotton lawn inkjet fabric sheets. This particular brand is my favorite as the fabric is a high 240 thread count that feels much more like nice quality quilting cotton and holds the color very well. The photos on each spanned from the couple's wedding portraits to their 50th anniversary photos, and included photos of them and their children through the decades.

The first quilt was done in grey, red and black, colors used in the couple's home. Mary was very pleased to have the completed quilt in time to present it at the 50th anniversary party this summer.

Both quilt labels had a Dala Horse added to honor the family's Swedish roots.
Following the presentation of the first quilt, Mary contacted me again and asked if I would make the second quilt for the other brother and his wife. Being Seattle Mariners fans, we chose their colors of blue, green and silver for the piecing.

The second quilt, which also included photos through 50 years of marriage, children, grandchildren, and their first great-grandchild, is a surprise that will be presented to the couple at Thanksgiving by their children. Mary and her husband drove to Baldwin City today to pick up the quilt in time to ship it to their niece in Seattle in time for next week's holiday gathering.


I tried my best to give each a unique look while still working with a 3x4 layout of the 12 photos included. All piecing was done with Aurifil 50 weight cotton thread. The quilting was done on Sassy, my HandiQuilter Sweet Sixteen sit-down, with cool grey Glide thread, which provided a perfect silver tone on each of the quilts. The blue backing on the second quilt is the perfect backdrop to show off the quilting.

Now I'm on to other projects for Christmas, which is fast approaching!

More snippets from the sewing room soon,
Liz

Thursday, August 11, 2016

Busy, Busy! Quilting for others is a fun challenge!

This summer I've been busy quilting for customers, facing new challenges that have made me grow as a sit-down quilter. My own projects have been put on the back burner for the most part, especially since summer enrollment in classes at the local quilt shop have been down with vacations and now back-to-school activities keeping quilters busy. The projects this summer have ranged from quilting "And On That Farm", a McKenna Ryan design made by a friend/student in one of my quilt classes, an applique quilt that was 30 years in the making, a wonderful patchwork quilt made with reproduction fabrics, and more. It's been an adventure to say the least!  Sassy, my Handiquilter Sweet Sixteen, has been very busy this summer. When I checked the system info last week, I found there are now over 11 million stitches on her since I bought her in 2012!!! My proficiency as a sit-down quilter has definitely blossomed in the last four years.

The summer started out with this beauty, an original design wall hanging entitled "Trio: Reaching for the Stars", made by an art quilter from Kansas City who will have a solo quilt show hanging in September. Doris cut the dresses for the three ladies from a vintage jacquard tablecloth, using the woven designs as the focal point that gave me the perfect lines to follow for the quilting. Adding feathered tendrils reaching up the quilt towards the stars made for a wonderful background fill. I haven't seen the completed piece yet, but know she was going to be adding fibers for hair and a head wrap on the ladies. Such amazing creativity that I was blessed to be a part of!


When The Trio was completed, Doris brought me a large scale log cabin wall hanging made with strips of ultra-suede sewn to a muslin base. She requested I do something different in each strip to add interesting textures. Rather than every strip, I chose to repeat the same design in the strips of the same color. It was a wonderful experience and gave me the opportunity to really stretch my "bag of tricks" as far as coming up with designs that played well together, yet weren't to similar to each other. I also got to play with some new rulers, especially this circle template that allowed me to make chains of nearly perfect circles in several rows across the quilt.


Last winter, Kelly Cline, the queen of quilting vintage, had a drawing to choose 20 lucky winners who would get to quilt a napkin or placemat from a collection of matching linens she had found while exploring antique shops on vacation. Being one of the lucky winners, I got to quilt this gorgeous piece of linen. I put it over an aqua blue dupioni silk background, layered it with Warm & White 100% cotton and Hobbs Wool batting, and started quilting. The linen piece is quilted with Invisifil 100wt which is so fine it disappears into the background. It was great fun and such an adventure, once again, figuring out what to do with that open space in the center. This piece is now part of a 20-piece permanent collection of Quilting Vintage linens that will soon be displayed at quilt shows across the country.


This quilt was hand appliqued by a friend from my former guild in Emporia, Kansas. She had planned to do some hand quilting on parts of it, but after shoulder surgery, was unable to get that accomplished. Instead, I'm quilting the entire quilt for her. This is one of the applique blocks that is getting echoed. The alternate blocks have feathered wreaths that will have cross-hatching behind them. Ann requested it be quilted with cotton thread which is what she would have used if she had hand quilted it. I was able to color-match a beautiful creamy Aurifil 50wt for all of the background quilting, as well as colors that blend well with the applique for those touches.


With the county fair fast approaching, one of my quilt class students asked if I would be willing to quilt her "And On That Farm" quilt made from McKenna Ryan design. I put the final stitches in just 3 days before quilts were due to be turned in! She went home and got busy adding the binding and embellishments, and had it ready to enter. I'm so happy for her because she won a blue ribbon and Reserve Champion in her category! Well done, JoAnn! I added loads of texture to the fusible applique, bringing it all to life, which is the fun part of being the quilter.


With summer slipping away, I received a call from a gal who had delivered her quilt top to me a couple of months prior. A deadline I didn't have down in my notes was apparently looming, so it was next to get pinned and started. This quilt was 30 years in the making, inspired by a photo in a 1983 magazine. Ruth and her sister-in-law designed their own applique, got started, got distracted by life and tucked it away in her closet for nearly 25 years. After another sister-in-law passed away, the two decided they had better pull it out and get it done while they were both still able. This "Tree of Life" was done with a combination of hand and machine applique techniques. It was an adventure quilting this beauty, figuring out what to do with that much negative space around the applique that is large enough to cover the top of a queen-size bed! With inspiration from quilter and national teacher Kris Vierra, I dove in and had a blast. Not pictured is the drop border on three sides made up of three borders that measured close to 18 inches that were quilted with feathers, wishbone, and piano keys.


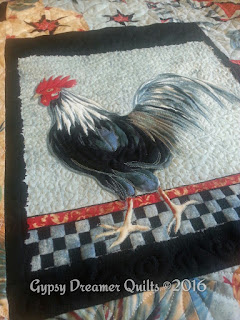
One original design I made this summer as a shop sample for Quilting Bits & Pieces in Eudora, Kansas, is The Roosters, a Hexified Panel Quilt. I'll be teaching it this fall for them and made this sample experimenting with pillow-panels as an option for a smaller, wall-hanging size project.


Wrapping up the summer, I'm quilting this wonderfully rich reproduction fabric patchwork for a friend I see twice a year at retreats I attend in Oklahoma. The patchwork was a perfect place to use the gentle curve/orange peel. I chose to include the setting triangles with the sash to fill in with feathers. Layered with Hobbs wool batting, the texture and poof are wonderful! This quilt goes back to its maker next week when I head to Oklahoma for the summer retreat.

While I haven't had a lot of time for my own projects, I have had a blast challenging myself as I hone my free motion quilting skills with a variety of projects that each presented me with its own opportunity to learn. I find that the quilters who seek me out are those who want something different, free motion, and not pantos or edge-to-edge quilting. Having a HandiQuilter Sweet Sixteen sit-down machine, this suits me just fine and I plan to continue to rise to the challenges presented as I continue to build my quilting business.

This week my challenge is to pick out a few projects for ME to work on at two retreats coming up in the next couple of weeks! Having time to dedicate to my own creations will be great fun! For those who may not have connected with me on Facebook, I have a page for my quilting where I post much more often than I post here. There's only so many hours in the day and FB is so easy! Feel free to "like" me on FB at Elizabeth Granberg Custom Quilter or https://www.facebook.com/gypsydreamerquilts/

More snippets from the sewing room soon,
Liz

Sunday, June 5, 2016

More fun with Quilting Vintage

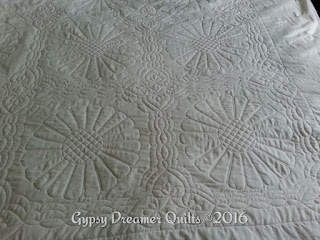
I was blessed to be asked to quilt a beautiful hand pieced Dresden Plate quilt made by my client for her granddaughter as a graduation gift. The top was pieced with vintage fabrics and appliqued onto muslin, giving it a vintage feel despite being recently made for this special occasion.

Grace was worried that the piecing of the blocks with their sashings were not all quite uniform. I went to work thinking about how I could use the quilting to bring the focus to her beautiful Dresden Plates. As I got the quilt sandwiched and ready for quilting, I decided to work on outlining the plates first, adding crosshatching in their centers. Next I looked through my collection of quilting stencils and found one that I was pretty sure would work. If placed on point to fill the space over the intersections of the blocks, it would disguise any anomalies and give a nice flow to the overall look of the quilt.


Again, adding echoes to the stencil design instead of echoing the actual plates, some of which had less rounded petals than others, drew the eye away from any inconsistencies and created a beautiful design.

As always, the look from the back is so striking, especially when quilted with a solid backing that showcases the quilting. This particular quilt was so fun to watch take shape from the back!
The final touch was to add swirls and feathers in the inner and outer borders. At her request, after I completed the quilting, I also trimmed the quilt and machine stitched the binding on for Grace, so all she had to do to finish was the hand stitching of the binding to the back before leaving for her granddaughter's graduation. Grace was overjoyed with the results!

Thank you for trusting me to come up with a quilting design that would highlight this beautiful quilt!

More snippets from the sewing room soon,
Liz

Saturday, March 12, 2016

Vintage Patchwork Talks to Me

In my free-motion quilting classes, I always tell my students to listen to their quilts, whether they pre-mark their tops and plan every detail ahead, wait until their quilt sandwich is pinned, or even during the process of quilting. I truly believe my quilts talk to me and tell me what they want or need to make them shine. No, I don't think I'm crazy. I just like to go with the flow and follow my intuition, which, in turn, is the quilt speaking in this case. So far it seems to be working! 
All of my quilting is done on Sassy, my sit-down HandiQuilter Sweet 16. For six years I quilted everything from mug rugs to a queen size quilt on my domestic sewing machine. Then four years ago, after my father died, I splurged and purchased Sassy and have never looked back. I love the control I have working on details as I move the quilts under the needle. I've even found a way to use two small craft tables beside my chair to create a U-shaped "nest" where the bulk of the quilt is supported by both Sassy's 6 foot long table (yes, I have the add-on table extensions) and the tables beside me so I have no problem with drag. 
Recently my friend Wanda brought me a small top to be quilted. If my memory serves me right, her mother had made similar tops with blocks she hand appliqued petals on surrounded by left over patchwork hand pieced by Wanda's great-great-grandmother for Wanda and her sisters, and her mother hand quilted them all. A final top was assembled from the same vintage patchwork and hand appliqued blocks, but the thought of hand quilting yet another top was too much. That's how it ended up with me. Being a satisfied return customer, Wanda told me to do what I wanted with it.
I knew I would be seeing Wanda this weekend, so I pulled it to the top of the "to be quilted" stack and dove in. The little patchwork squares begged to be orange peeled to set them apart from the applique blocks. Each little square measures approximately 1 1/4" and with this setting, they were all on point giving me some measure of concern on how to keep everything square with those rows of squares all being on the bias to the length and width of the top. Plus, being hand pieced and somewhat irregular in size/shape, I didn't want to ditch the quilt. I did my best to keep things square as I started quilting, ditching each of the applique blocks along the way, and overall it turned out great! The entire top only measures 33" x 46", perfect for a vintage quilted wall hanging.
Getting all of the orange peel done in a couple of evenings, the applique blocks were next. I didn't want to quilt on the applique, so ditched around each petal to give them added dimension, and then added swirling tendrils around them filling the negative space without over-quilting those blocks. The first run didn't quite cut it, so I added an extra tendril that filled the corner spaces before I was done.
Finally, there were the corner and setting triangles. The small setting triangles got a quilted flower with tendrils similar to the applique blocks, and then I played with the corners.

In the four corner triangles, I used a combination of stacked teardrops, pebbles, small sections of feather, and a little McTavishing, each corner being unique in its combination. The corners add a little of the fun, modern side of my quilting to this vintage piece.
It goes back to its owner this evening and I'm sure she's going to love it as much as I do! And now it's on to the next project in the tote as I continue to work through both client quilts and my own UFOs.

More snippets from the sewing room soon,
Liz

Tuesday, March 1, 2016

Taking the Leap into Sample Quilts!

With the encouragement of my friend Sharon, the owner of the local quilt shop where I have been teaching for the last year, I brought several sample quilts and tops to the shop to show a fabric rep she was working with late last year. As it turns out, not only was the rep impressed with my technique/design, so was her boss! Long story short, in December I received fabric enough to make one of my hexified panel quilts to be displayed in their vendor booth at the spring International Quilt Market to be held this May in Salt Lake City. Woohoo!!! While I'm still building my quilting business, this seemed to be a jump-start in the making! 

The new line Garden Rendezvous, by Ro Gregg of Paintbrush Studio Fabric, is a gorgeous line of fabrics that features a panel full of spring flowers surrounded by a Celtic lattice frame. I was excited to dive in and see what fabulous hexies this set of panels would offer. The first few were so amazing, I kept going and got the whole batch up on the design wall as quickly as I could.
This first hexie was enough to get me excited to keep going!
The more hexies I worked with, the more intrigued I became.

With a deadline initially set for the end of March, I knew I had my work cut out for me. Getting the 60 degree triangles cut and sewn together into the half-hexies that would be pinned together for layout purposes, was the easy part. I've done enough of these now that the assembly portion has become almost routine. Getting the pinned hexies up on the design wall and getting a layout I'm happy with is the trick!
The initial layout is simply a process of getting all of the hexies on the design wall in color groupings.

The first step is to put the panel up on the design wall and then put all of the pinned hexies up in random order and leave the sorting for later. I do try to put like-colors in groups just to get a head start on the sorting process. From beginning to ending of the design process, the hexies shift and move from side to side. With each major shift, I take a picture so I can go backward if necessary. For this quilt alone I have over 40 digital photos in my file, one taken each time I moved hexies around until I was satisfied with the layout as being ready for actual sewing together. From initial layout to being ready to sew can take days or longer. Sometimes I allow myself to walk away for a couple of days, only to come back for a fresh look to make more adjustments.
The layout is just about ready to sew together!

I was almost done with the color flow when I got a call from the rep who gave me the news that they wanted to display the quilt at yet another show coming in mid-March! This meant my deadline to get done was moved up an entire month. It was time to really get moving. With the color flow done, I started playing with the flange around the panel, the inner border, and the options for the outer border. The beautiful eggplant was perfect for the flange and inner border; however, the border stripe was just not giving the quilt the pop I wanted it to have.
Auditioning the border print. Even in bad lighting, it just didn't have the pop I wanted.

I went back to the rep and we selected a coordinating all-over print instead that appeared to be the perfect solution. The lavender background of the new border choice brought life to the hexie color flow that I was finally satisfied with. Time to sew!
With the top completed, it was time to pin the layers together and get to quilting. I had a number of ideas for this quilt including my usual gentle curve/orange peel along the seams in each of the triangles of the hexies, outlining the flowers on the panel, and feathers in the border.


It was amazing working with Invisafil, a new-to-me 100 weight thread, that just melted into the background leaving the texture without showing. Seeing the panel come together from the back is always fun as the quilting takes shape. This view also gives me time to consider what I need to add to fill the background so the primary motifs truly shine. 
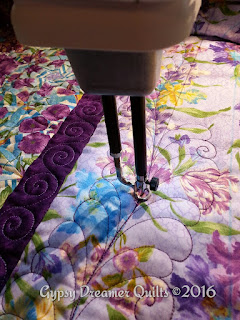
Feathering along the border, keeping them inside the blue line I'd marked.
I had intentionally made the borders wider than I needed. I did this in case the quilt shrank more than expected from the quilting, ensuring I would still be able to hit the target size requested. It's always easier to make a block or quilt larger and trim it down, than to make them too small and be stuck. Before quilting the border feathers, I marked the entire border an inch inside the outer edge with a water soluble marker. I also marked a gentle wave with my wave ruler to use as a guide for the border feathers. After stitching the stem all the way around, I dove in, keeping the feathers away from the blue line I'd marked. 
The borders came out better than expected as I experimented and played with new ideas.
For the final border touches, I pebbled between the swirled inner border and the feathers, and then did some ruler work adding straight lines from the feathers to the edge of the top spaced 1/2" apart. 

Viewing the quilt from the back showed just how much fun I had quilting this! The body was quilted in tan Invisifil on top with linen Glide on the back, and all of the border work was done with purple ARC poly on top and bottom. Quilted entirely free motion on Sassy, my HandiQuilter Sweet 16 sit-down quilting machine, the overall design was really coming together!

The mini-stipple in the background of the panel was great a great addition!

The last step was to fill in the open areas of the center panel around the flowers. Although my wrists and shoulders complained later, I love how the mini-stipple filled the background and made the flowers actually look appliqued once complete!


Finally, I cut strips from the eggplant to use as binding. The quilt was nearly complete. With the deadline looming, I worked long hours to be sure it was done on time. Knowing a UPS pickup ticket had been ordered for this Monday, February 29, I spent Sunday madly binding. The last stitch went in just before 5:00pm, in time to catch some sunlight at nearby Baker University campus where I hoped to find a good spot to get some photos. 
Although not in a sunny area, I love how this picture on the stone bridge turned out!
I lucked out with a sunny grassy area with a slight slope to it where I could get some pix without having my shadow showing. Here's what I captured from various angles, full quilt shots, and one with it draped over a stone bridge. Enjoy the quilty eye-candy!


After photographing, I spent the rest of Sunday evening adding the hanging sleeve, and stitching the label on. Monday morning the quilt was tucked into its box and by mid-day UPS had picked it up and sent it on its way. Garden Rendezvous Reimagined will be displayed in the vendor booth of Paintbrush Studio at two events this spring. First, at the 22nd Annual Mountain Quiltfest in Pigeon Forge, Tennessee, from March 15-19 where Ro Gregg, the designer of the fabric used, will be a guest speaker. It will also be displayed in the Paintbrush Studio vendor booth at the Spring International Quilt Market in Salt Lake City from May 20-22.

This is my first venture into making a commercial sample and am very excited it will be getting this kind of exposure! I don't know what the future will bring, but after taking this leap, I'm ready!

More snippets from the sewing room soon,
Liz