Sunday, November 29, 2015

When iced in... Quilt!

Driving into the sunset on Wednesday evening.
On Wednesday afternoon, I drove 2 hours to one of my best friend's homes to spend the long holiday weekend. I joined Linda and her family for Thanksgiving dinner for the third year in a row where, this year, we had over a dozen children to entertain us! It was such a joy to see so many children among us as the family continues to grows and friends with children are included in the celebrations. With plenty of food and fellowship, we were blessed to be together on an icy day. The remnants of that meal will feed several of us for several days this week as we enjoy leftovers.


Carving the turkey and ham, getting ready to feed the crowd!
The kids are gathering at the kid-table, ready for their Thanksgiving feast!
The rest of the weekend was spent staying in and warm at the sewing machine while the ice continued to accumulate throughout the weekend.
The leaves were coated with ice that only got thicker as the weekend progressed.

A stack of over a dozen movies still sit on Linda's TV stand that we watched throughout the weekend as light entertainment. To say the time spent was productive would be an understatement. Two tops were completed, a third has all of its parts ready for the design wall, and a fourth has the hand-binding over half done. Only one project remained untouched, but I have the necessary foot (thank you to another friend who loaned it to me!) to complete the pintucking necessary before the applique can be done.
Stitching the final rows of half-hexies together to complete the Snowday top.
Snowday hexified panel top complete! Now to decide on borders for finishing.

The parts of the Snowday hexified panel were nearly ready to be assembled when I left home. I completed sewing the rows of half-hexies together for the last section and then successfully framed the panel to fit and assembled the top. Additional borders will be added before it is entirely complete, but this is a great step forward in getting it done.
Experimenting with layout options for the remaining sets of triangles of Skylines.

The pairs of triangles are sewn and their thirds are waiting to be sewn on.

Half of the strips cut for the Skylines hexified panel had been cut into triangles and sewn together at a previous retreat. This weekend I cut the remaining strips into triangles and got them all sewn together into half-hexies, and all of the halves are now pinned together.
All of the Skyline hexies are pinned and ready for the design wall.


Original design Elvis quilt top is ready for borders and quilting!
Another project I took along was one I had started several months ago. A good friend from California had purchased several pieces of Elvis Presley fabric that she had sent to me to turn into items for her to gift among friend in the Elvis Fan Club she belongs to out in Los Angeles. This weekend I finally put the final stitches in the top of the throw. I even have enough of one of the fabrics to cover about 80% of the back, so with a little inventive piecing, even the back will be Elvis!

Hand stitching the binding to finish The Iris.

As projects got completed towards the end of our weekend, I pulled out The Iris and made it over half way around, hand-stitching the binding down to get it finished up. All in all, I got so much accomplished this weekend! It was so amazing having the entire holiday weekend to dedicate to finishing or making significant progress on several projects. Good company, good food, a warm place to work, can't be beat!


By the end of the weekend, it had rained/sleeted/iced for three days and there was about 1/2" or more of ice on everything. Luckily by Sunday morning the temperatures had climbed up above freezing, so the treated roads were just wet for driving. As I prepared for my drive home, I took some amazing pictures of the ice on trees and grass. Although an ice storm is nothing to play with and can be very deadly, it is still gorgeous to see. I left during a window of mid-30s when it sleeted or rained much of the way home. The forecast tonight calls for more freezing rain and ice overnight across central Kansas, so I am grateful to be home safe and warm after an amazing weekend.

More snippets from the sewing room soon,
Liz

Sunday, November 22, 2015

Holiday Baking Tradition Continues

Today I took a break from quilting and spent a good portion of my day baking the traditional Norwegian Christmas bread, Yulekaga, that my dad and his parents before him, and I'm sure his Norwegian grandparents before them have always baked for the holidays. The recipe that was handed down to me makes a large enough batch of bread dough to make five loaves! As my dad always did, I bake one batch just before Thanksgiving and another batch shortly before Christmas. Most loaves are gifted either to friends locally or sent to special friends and family across the country.


As a child I remember Dad getting home from work about 4:30pm and my mom having all of the ingredients set out on the kitchen table ready for him to begin the process as soon as he walked in the door. From beginning to end, it takes close to 8 hours to make yulekaga, so he would be lucky to be getting it out of the oven by midnight. My special job back then was to open the cardamom seed pods to extract the seeds, which were then placed in a small (and now very old) wooden pepper grinder that was kept in the spice cupboard for that sole purpose. I'd then course-grind the seeds into a small bowl that would get emptied into the bread dough at just the right moment as directed by Dad.  


My dad getting ready to bake the annual batch of Yulekaga
During the 7-1/2 years I lived with and cared for my parents from 2004 to 2012, I helped Dad with the bread-making process each year. It was a sad day when I came home from work towards the end of our time together and found that Dad had killed the yeast and forgotten several key ingredients. From then on he "supervised" as I took over the duty for him.

The recipe as given to me goes as follows:
  • 1 quart milk
  • 1 cup sugar
  • 6 eggs 
  • 1 Tbs ground cardamom seed
  • 1/2 lb butter
  • 1 Tbs salt
  • 3 pkg yeast
  • 10 cups flour
  • 1 lb candied fruit & peel
  • 1 lb raisins
  • 1 lb golden raisins
Scald milk and add sugar. Cool to lukewarm (using a candy thermometer to get in the correct temp range to activate the yeast). Add yeast and half flour.* Beat well. Add salt and eggs. Beat well. Blend in melted butter and add remaining flour. Mix in ground cardamom and fruit.    *I add the cardamom with the first half of the flour for better flavor distribution.

Place in greased bowl and let rise until double (approx 2 hours). Punch down and knead, put back in bowl and let rise again (approx 2 hours). Punch down and knead, divide into five equal parts and place in greased loaf pans and allow to rise again (approx 2 hour). Bake at 350 for ~1 hour.
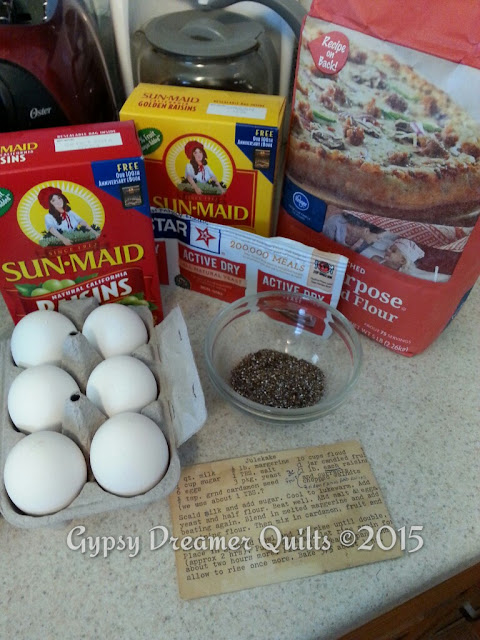
Gathering the ingredients for the first batch of Yulekaga of 2015.

After comparing recipes with my cousins, it turns out there are variations. One uses condensed milk instead of milk as I've found in several online recipes. Another variation is how it was baked. My dad's brother always put the dough into the old metal coffee cans and baked tall round loaves instead of using purchased loaf pans. However it's made, I'm grateful several cousins are also continuing our grandparents' tradition.

I've made this recipe so many times now that I have it memorized, so when I get to the grocery store I can easily grab what I know is missing from my pantry on baking day. The only limitation to making it is that the candied fruit and peel is only available from just before Thanksgiving through Christmas. Once it's gone, it's gone until the next winter holiday season. The last few years of my caregiving time, I purchased several extra tubs and put them in the freezer so I could make it anytime so Dad never ran out. Having a slice of toasted and buttered yulekaga with a cup of coffee was his favorite mid-morning snack.
Blending the ground cardamom into the batter after the first half of the flour is added gives a better flavor distribution.


The only thing I have changed on the recipe is when to add the ground cardamom. Instead of waiting to add it with the fruit, I add it after the first half of the flour is added to the batter. It gets distributed throughout the dough much better than waiting until after all of the flour is added.

The dough doubles in size each of the three times it rises--twice in the large bowl and once in the loaf pans.
Once the dough has raised twice in the large bowl, it gets dumped back onto the large cutting board to be punched down and kneaded again, then divided into five portions to be put in the loaf pans to rise a third time.
My loaf pans include the one my mom used to make and cut her fudge. Do you see the score marks?


The loaf pans I use include several that my dad used that had also doubled as fudge pans for my mom. There are still knife scoring lines in the pans where she cut the fudge.
Dough has raised a third and final time in the individual loaf pans and is ready to bake!

To get the five loaves into the oven all together, I place two across the back end-to-end, then three next to each other in front of them.

Tonight I set the timer and brought it in the living room so I would hear it. It's a new one as my old one died. Well... this one doesn't work either. It never dinged... at all... I was sitting in my rocker reading bedtime stories to my 3-year-old grandson and after the last book realized I didn't hear the timer ticking. I got up to look and it had stopped at 0 without making a noise! Yikes! I went into the kitchen, opened the oven, and discovered that the baking time for this batch was exactly the length it took to read four bedtime storybooks. Perfect timing!
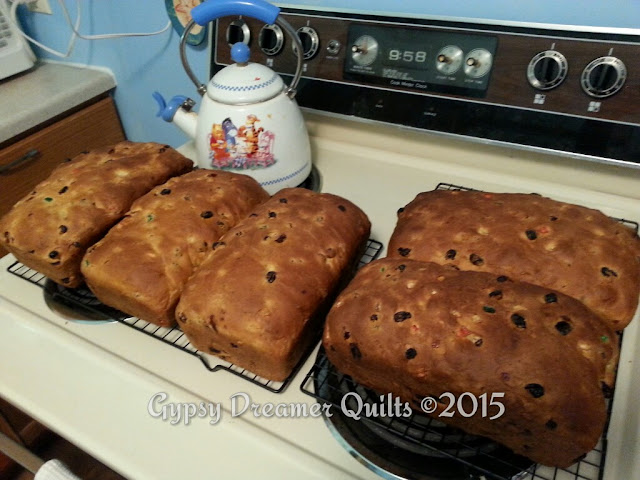
Freshly baked loaves of Yulekaga are cooling on racks, waiting to be bagged and frozen until gifting.

The bread is cooling and will be double bagged and put into my freezer until time to gift it.

After a fun evening of playing with Mormor's wooden train set, Jacob is sound asleep on the makeshift bed of couch cushions. He was perfect company this evening and we plan on having a wonderful play day together tomorrow. We will start our day with a piece of toasted yulekaga for breakfast as promised by Mormor at bedtime.

More snippets from the sewing room soon,
Liz

Saturday, November 21, 2015

Through the Ashes, Bringing Hope

My friend Jeannie and her family lost their home to a forest fire in Bastrop, Texas, several years ago. She was blessed to be gifted a quilt for her daughter's toddler bed that is now being used by her younger daughter in their new home. This fall there was another round of forest fires around Bastrop that destroyed the home of someone she knew with a small daughter. She asked me, knowing I'm a quilter, if I could help by making a toddler-bed sized quilt to gift to this family. I've made blocks and quilts for victims of house fire before through a Facebook group called Sew It Forward. That group hasn't been active lately, so I knew this was something I wanted to do.
I went in my stash and found this delightful Daisy Kingdom fabric from several years ago that I had bought with thoughts of making something for my granddaughter before life turned upside-down with my move to care for my parents in 2004. I pulled it out and thought it was perfect! Bright, cheerful, perfect for a little girl who just had her life turned upside-down.
Border print framed with the smiling daisies became the backing for this quilt.

What started out as the pieced back later became the front, embellished with quilting and thread painting.

I took the yardage with me to a sew-day and started cutting pieces to put together. Using the border print bordered by the smiling daisy print for the top was my initial thought; however, as the friends I was stitching with watched my progress, they loved the randomly pieced backing and thought it should be the front. I switched gears and went with it. As the layout came together, I found I needed one more piece to fill in a few blank spots. There just wasn't quite enough there in the three original prints to make the entire quilt, front and back. I found the purple in the shop where we were sewing and picked up a half-yard cut to fill in those open spots. Before we left that day, the top and back were pieced and ready to sandwich. I even got approval of the top layout by our youngest quilter who even posed for a quick pic!
I packed up and went home from our sew-day to sandwich and begin quilting right away. I knew Jeannie wanted to get this quilt delivered as soon as possible, so it needed to get finished and shipped off to Texas quick! That weekend I was able to work on it and completed the quilting, and got it bound. I sent it through the washer & dryer, and packaged it up to ship in record time. I used two spools of poly thread, one pink and one purple, through a single needle on my Handiquilter Sweet Sixteen to thread-paint the lettering of "You are my Sunshine" in the large yellow block. I had used a water soluble marker to draw registration lines and then draw the letters to follow with my stitching. I then stippled around it with a swirl meander.
Then I moved on to the other blocks. Most of it was quilted in pink, and some in a soft yellow. The yellow sides of the half-square triangles were quilted with feathers in pink thread, and modified orange peels filled the smiling daisy halves. One of the smiling sun blocks and several flowers and bugs on the large print were outlined to give them dimension, while the rest of the quilt was quilted with swirls and loopy meanders.
I added the words "love" and "hope" in the quilting of the two small horizontal yellow blocks near the top of the quilt. I was delighted with the results of my last minute, stash busting efforts to create a quilt for a little one who needed comfort after she and her parents lost their home to fire.
The quilt has safely made it to Texas and has been delivered to the family. I blessed and released this quilt with no expectation of acknowledgement as this family recreates their life from ashes. I pray that the little girl who received this quilt feels the love that went into every stitch to bring her comfort.

More snippets from the sewing room soon,
Liz

Four Different Looks, Same Pattern

Recently a friend asked me to quilt four table runners for her, three of which will be offered at a spring charity fundraiser. All four were made from the Charmed Table Runner digital download pattern from Annie's Craft Store using charm squares and coordinating yardage. Three were made with fabrics from three different universities near and dear to people in our region of Kansas--University of Kansas, Kansas State University, and the University of Oklahoma (yes, we have friends in southcentral Kansas who love OU!). She also had one made in Christmas fabrics for a gift exchange.

As I began thinking about about how to quilt them, I decided each had to have its own personality. So the thought process of how to quilt each one differently was started as I put my free-motion quilting ideas and skills to the test at Sassy, my HandiQuilter Sweet Sixteen. I started with the Christmas runner figuring swirls and snowballs (large pebbling) would be great for the center with a loopy meander in the charm square border. It came out great and had a wonderful wintry feel to the quilting.


Next I moved on to the University of Oklahoma. This one I decided to do some linear ruler work in the border, quilting lines 1-1/2" apart and adding a second line 1/4" away in the charm square border. At the corners, a cool windowpane plaid design appears where the linear lines intersect.  The center was quilted with swirls and I added feathers in the setting triangles at both ends. Overall, the look is quite nice!

I was gaining confidence as I moved on to the Kansas State University runner. This time I changed things up and quilted a 1" crosshatching in the center part and swirls in the charm square border, adding feathers to the setting triangles at either end of the center section.

Finally, I moved on to the University of Kansas runner. Being a huge Jayhawk fan, this is my favorite of the four. Going for a completely different look on this one, I pulled out my various rulers and templates and picked the HandiGadgets 8"x4" Arc B2. With this template lined up 1/4" away so my arcs would meet at the intersections, I quilted arcs in each charm squares around the quilt, including the setting triangles. The center section was crosshatched at 2" creating a nice balance in quilting density across the runner.

It amazed even me how different each one looked once completely quilted with the different designs! Having returned them to my friend, I'm looking forward to seeing them trimmed and bound soon. It was a fun challenge for me to create four unique pieces from the same pattern. I love challenges and look forward to new ones with coming projects!

More snippets from the sewing room soon,
Liz

Friday, November 13, 2015

Roadtrips for the Row by Row Experience!

My, oh my, how time flies. I had intended to write about my roadtrips to California and back with my grandkids in 2013 and 2014, had actually started writing, saved it as a draft, and then got distracted. I found the draft in my folder and decided to go ahead, even though it's been over a year since our trips. Here's a recap post with some of the highlights. Here goes...

Jordyn was a wonderful traveling companion on our 2013 trip from Kansas to California!
Some of the fabrics Jordyn and I collected on our 2013 roadtrip

More of the fabrics Jordyn and I collected on our 2013 roadtrip.

In June 2013, the first year I participated in the Row by Row Experience, I drove my granddaughter, Jordyn (then 9) to California for her annual visit with her Nana & Papa. We drove out US-40, taking many detours to visit quilt shops where she collected fat quarters with something she had seen along the way. Traveling through the southwest and along parts of old Route 66, she found some great fabrics and in the fall during weekend visits to my house, she made her Road to California quilt. These two pix are of Jordyn showing off the front and back of her completed quilt.


When the 2014 Row by Row Experience started, several friends and I started taking day-trips to pick up free patterns and kits for the rows we liked best at shops within a day's drive of our home in northeast Kansas. As summer progressed, I already had plans to return to California to deliver my mom's china to my great nieces, and visit family and friends. Since my grandkids, Joe (14) and Jordyn (10) wouldn't be flying out for their typical annual trip to see family in California, my daughter and I decided they would go with me! Jordyn was already making her third quilt, so was anxious to stop at some shops along the way to buy fat quarters to make yet another one. Since we were all together, I told Joe he could also get a fat quarter at each shop, but only if he agreed to make at least one quilt top from the fabrics he selected. He agreed and, by the time we got home, each grandkid had more than enough fat quarters to make their own Turning Twenty or similar pattern on weekend visits to my place.
Day 1, taking off for California with two grandkids on a 2-week roadtrip.

At nearly every shop we took a picture out front before we left (we only forgot a couple). At a few shops, someone volunteered to take the picture for us so all three of us could be in the shot. The kids tired of being in all those silly pix, so soon it was just me with one of them manning the camera. In addition to quilt shops, we also go to visit family in Wyoming and California, plus did a great deal of sight seeing, especially in the southwest on our way home by way of the Hoover Dam, the Grand Canyon, Petrified Forest National Park, Three Rivers Petroglyphs National Site, Meteor Crater, among other sites. There was a fair amount of silliness along the way and, amazingly, no arguments whatsoever about who would ride shotgun. Joe preferred the front seat near the charger for his phone, while Jordyn made herself a nest in the back with her books, puzzles, and easy access to the cooler to keep us all supplied with snacks and drinks.


After two weeks on the road and 4,640 miles on my car, we returned home with over 20 new row patterns from five states and plenty of fun quilty license plates to share! The kids had each collected over 20 fat quarters and, true to his word (with a little arguing), Joe completed his Turning Twenty quilt top. Jordyn opted to make a Christmas quilt first, which she is quilting herself on my HandiQuilter Sweet Sixteen, and is still in the process of making the blocks of her quilt with fabric from our trip. Once those two quilts are done, she already has the next pattern picked out.


On both trips we had so much fun! The kids were great, we saw so many wonderful sites, and enjoyed visiting with family and friends along the way. There was no roadtrip this summer, but in coming years I'm sure we will load up and head somewhere again.

More snippets from the sewing room soon,
Liz

Double Wedding Ring, Modern Style

After posting a number of my quilts on various quilting forums on Facebook, I was contacted by a gal in South Carolina asking whether I make quilts on commission. I said yes and we started talking. She asked for a double wedding ring centered in the throw-size quilt and emailed me a picture of what she wanted. Unfortunately, as I researched, it turned out to be a 9" in-the-hoop machine embroidered single ring, not a large ring that could be turned into a throw. I told her I would be willing to design a large DWR block that could be centered in a throw with two complete rings. She agreed and we went to work selecting fabrics.

The fabric selection process was interesting as I was in Kansas and she was home in South Carolina. I went to my LQS and started pulling fabrics and taking pix, sending them to her via Facebook Messenger, and through a process of elimination we managed to select fabrics she was happy with. Then it was back to the drawing board to adapt a DWR pattern to 18" blocks that would ultimately result in two interlocking rings measuring approximately 24" wide by 48" long to be centered on the throw.

Before cutting into her fabric, I decided I'd better make a mockup to be sure the pattern worked in the larger size. The pattern I had found in my stash turned out to be rounded squares, rather than circles. I was immediately grateful I had decided to do a test first. While it's beautiful, it wasn't the look I wanted for the commission.
The first pattern didn't have the round rings I wanted.

After digging deeper, I found in my pattern drawer Eleanor Burns' Double Wedding Ring pattern, which definitely had the more round DWR look that I was going for. I was able to enlarge the template for the rings to about the right size and went to work cutting out 18" blocks of the background fabric. I had already decided that I would applique the rings rather than do the curved piecing, especially since it wasn't going to be a tested pattern as I was enlarging and adapting for a unique quilt. The only problem with doing this was that the template had extra fabrics for seam allowances included, as this pattern was intended to have the ring sections sewn to interfacing, turned right-side out, and appliqued with finished edges. More figuring and some trimming, and things were coming together.

Once the rings were stitched down and the top was ready for quilting, I faced yet another challenge. There was a huge amount of negative space, especially around the rings up to the outside edge, that needed to be quilted. Filling negative space is a fairly new process for me, so I did some sketches and decided to use my vine ruler to trace a curved border about 8" in front the edge as a boundary. Outside the curved line I quilted piano keys, and inside I quilted swirls, pebbles, and in each corner a pumpkin with vines. Within the rings I quilted feathers filling the center space and the curved ovals. To get a good pumpkin, I printed out a pumpkin design and then drew one in each corner using the printout as a template.


Once the quilting was done and the binding was on, it was into the washer and dryer to remove the marking dust, as well as to do some blocking before shipping it of to my client. I was very pleased with the results and she was delighted when she received it!
I had made quilts for local people before, but this was my first experience doing it long distance. Overall, it was a great experience and I hope to do so again.

More snippets from the sewing room soon,
Liz